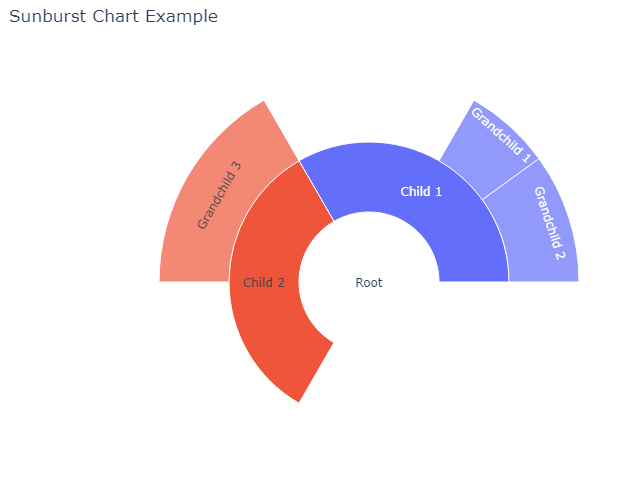
반응형

Matplotlib Tutorial - 파이썬으로 데이터 시각화하기


https://wikidocs.net/book/5011


Matplotlib Tutorial - 파이썬으로 데이터 시각화하기

## 도서 소개 - 이 책은 파이썬의 대표적인 데이터 시각화 라이브러리인 Matplotlib의 사용법을 소개합니다. - 30여 개 이상의 다양한 주제에 대해 100개…

wikidocs.net

Matplotlib 데이터 시각화와 2D 그래프 플롯에 사용되는 파이썬 라이브러리입니다.

Matplotlib을 이용하면 아래 그림과 같이 다양한 유형의 그래프를 간편하게 그릴 수 있습니다.


Matplotlib의 간단한 사용법을 소개하고, 예제와 함께 다양한 그래프를 그려봅니다.

예제들은 Matplotlib 공식 홈페이지를 참고해서 만들었습니다.

순서는 아래와 같습니다.


Contents

00. Matplotlib 설치하기
01. Matplotlib 기본 사용
02. Matplotlib 숫자 입력하기
03. Matplotlib 축 레이블 설정하기
04. Matplotlib 범례 표시하기
05. Matplotlib 축 범위 지정하기
06. Matplotlib 선 종류 지정하기
07. Matplotlib 마커 지정하기
08. Matplotlib 색상 지정하기
09. Matplotlib 그래프 영역 채우기
10. Matplotlib 축 스케일 지정하기
11. Matplotlib 여러 곡선 그리기
12. Matplotlib 그리드 설정하기
13. Matplotlib 눈금 표시하기
14. Matplotlib 타이틀 설정하기
15. Matplotlib 수평선/수직선 표시하기
16. Matplotlib 막대 그래프 그리기
17. Matplotlib 수평 막대 그래프 그리기
18. Matplotlib 산점도 그리기
19. Matplotlib 3차원 산점도 그리기
20. Matplotlib 히스토그램 그리기
21. Matplotlib 에러바 그리기
22. Matplotlib 파이 차트 그리기
23. Matplotlib 히트맵 그리기
24. Matplotlib 여러 개의 그래프 그리기
25. Matplotlib 컬러맵 설정하기
26. Matplotlib 텍스트 삽입하기
27. Matplotlib 수학적 표현 사용하기
28. Matplotlib 그래프 스타일 설정하기
29. Matplotlib 이미지 저장하기
30. Matplotlib 객체 지향 인터페이스 1
31. Matplotlib 객체 지향 인터페이스 2
32. Matplotlib 축 위치 조절하기
33. Matplotlib 이중 Y축 표시하기
34. Matplotlib 두 종류의 그래프 그리기
35. Matplotlib 박스 플롯 그리기
36. Matplotlib 바이올린 플롯 그리기
37. Matplotlib 다양한 도형 삽입하기
38. Matplotlib 다양한 패턴 채우기


반응형
반응형


The Go programming language enters the top 10


TIOBE Index for February 2024


https://www.tiobe.com/tiobe-index/


TIOBE Index - TIOBE

Home » TIOBE Index TIOBE Index for February 2024 February Headline: The Go programming language enters the top 10 This month, Go entered the TIOBE index top 10 at position 8. This is the highest position Go has ever had. When it was launched by Google in

www.tiobe.com


반응형
반응형

IT 리더들은 업무를 성공적으로 수행하기 위해 기술 능력 이상의 것이 필요하다는 사실을 안다. 여기에는 일반적인 비즈니스 통찰력, 업계 지식, 회계 능력뿐만 아니라 마케팅, 운영, 사이버 보안 및 기타 기능 영역에 대한 전문 지식도 포함된다. 이를 갖추는 것이 최근 몇 년간 베테랑 CIO, 경영 고문, 경영 컨설턴트들이 전하는 조언이었다.

그러나 이러한 조언은 CIO가 IT 부서를 성공적으로 관리하기 위해 필요한 것, 다시 말해 운영의 효율성을 높이고 주요 성과 요구 사항을 충족하는 데 필요한 사항만을 다룬다. 진정으로 두각을 나타내려면 다른 최고 경영진과 마찬가지로 리더십을 발휘할 줄 알아야 한다.

베테랑 CIO와 경영진 리더십 전문가가 오늘날 뛰어난 IT 리더가 되기 위해 필요한 필수적 특성을 소개했다.

1. 뛰어난 IT 리더가 제공하는 것
비전을 제시하는 리더십이 관리, 즉 업무 달성과 동의어는 아니지만 진정한 IT 리더는 실제로 “IT 비즈니스에 능숙한 사람”이라고 IT 관리 및 리더십 연구소의 전무이사이자 정보 관리 협회(SIM) 리더십 연구소 소속인 에릭 블룸은 말했다.

뛰어난 IT 리더는 IT 예산, 프로젝트, 인력 요구 사항 등을 관리하는 데 탁월한 역량을 발휘할 수 있다. 이들은 IT 포트폴리오 내의 각종 기술에 대해 깊지는 않아도 어느 정도 이해하며, IT 가 사이버 보안 및 조직의 다른 기능 영역과 어떻게 상호 연관되는지 파악한다.

블룸은 탁월한 업무 성과가 뛰어난 IT 리더의 기반이 되는 이유에 대해 설명했다. 그에 따르면 첫째는 IT 직원들이 기술 능력을 존중하기 때문이고, 둘째는 관리자와 경영진이 직원들의 기술적 성장을 도울 수 있기 때문이다. 셋째는 IT 관리자와 경영진이 이러한 지식을 통해 팀의 역량과 한계를 이해하고 지식을 바탕으로 직원들이 현업에서 탁월한 성과를 내도록 지원하는 동시에 수행 불가능한 업무를 맡지 않도록 보호할 수 있기 때문이다. 

블룸은 “IT 리더는 기술과 팀의 역량을 바탕으로 무엇을 할 수 있는지 알고 있다. 이를 통해 팀을 성공으로 이끌 수 있다”라며 이것이 진정한 리더십의 특징이라고 설명했다.

2. 탁월한 의사 소통 능력
수년 동안 CIO는 탁월한 커뮤니케이션 기술이 필요하다는 말을 들어왔다. 블룸과 다른 이들은 그 어느 때보다 오늘날 커뮤니케이션 기술의 필요성이 커졌다고 말하며 이유를 설명했다.

우선 대다수는 아니더라도 많은 CIO가 지리적으로 분산되고 원격으로 근무하는 인력을 이끈다. 이들 역시 원격으로 분산돼 근무하는 경영진의 일원이다.

게다가 CIO는 이제 IT 팀부터 비즈니스 프로젝트 담당자, 최고 경영진, CEO, 이사회 구성원, 때로는 외부 고객 및 파트너까지 더 넓은 범위의 이해관계자를 참여시켜야 한다. 그리고 각 그룹이 모두 이해하고 수용할 수 있는 방식으로 기술 로드맵과 비전을 브리핑해야 한다.

블룸은 “IT를 위한 최적의 비전을 마련할 수 있더라도 동기 부여를 원하는 대상에게 이를 명확히 전달하지 못하면 비전은 귀에 들어가지 않을 것”이라며 CIO가 훨씬 더 의도적이고 세심한 상호 작용 방법을 수립해야 한다고 말했다.

한편 인포테크 리서치 그룹은 IT 리더를 위한 뛰어난 커뮤니케이션 기술의 중요성을 수치화해 발표했다. 연구 결과에 따르면 커뮤니케이션이 10% 증가할 때마다 IT에 대한 이해관계자의 만족도가 8.6% 증가했다.

3. 다른 사람에게 영향력 행사
리더십 자문 회사 러셀 레이놀즈 어소시에이츠의 CIO 실무 리더인 에릭 시구르드손은 뛰어난 IT 리더가 커뮤니케이션 기술을 사용해 정보를 교환하고 영향력을 행사하는 방법을 알고 있다고 말했다.

물론 영향력 행사는 모든 분야의 리더에게 오랫동안 요구돼 온 역량이다. 하지만 시구르드손은 기업의 성공에 있어 기술의 기여도가 급격이 증가했기 때문에 IT 경영진에게 영향력이 더 중요한 역량이 됐다고 설명했다.

예를 들어 그는 점점 더 많은 CIO가 직접 CEO에게 보고하며 다른 최고 경영진과 동등한 위치에서 일하고 있다면서, “문제를 해결하기 위해 상사에게 갈 수는 없기 때문에 동료들에게 영향력을 행사할 수 있어야 한다. 수평적으로 문제를 해결해야 한다”라고 말했다.

마찬가지로 오늘날 CIO는 IT 외부의 결과물, 즉 디지털 및 기술 지원 비즈니스 이니셔티브에 대해 더 많은 책임을 맡고 있으며, 이러한 여정에 다른 경영진과 팀을 참여시킬 것을 요구받고 있다.

시구르드손은 “따라서 CIO가 성공하려면 가르치는 것뿐만 아니라 의미 있는 주제에 대해 다른 고위 리더들과 소통하고 동료들과 함께 도전적인 절충안을 모색할 수 있어야 한다”라고 덧붙였다.

4. 강한 자기 주장
SIM 리더십 인스티튜트의 전무 이사 짐 나이트는 뛰어난 IT 리더의 또 다른 특징으로 자기 주장을 꼽았다.

그는 “오늘날 여전히 많은 IT 담당자가 비즈니스에 종속돼 있다고 생각한다. 그러나 이해되지 않는 비즈니스 요구 사항이라면 밀어붙일 수 있어야 한다. 이는 비즈니스 통찰력, 비즈니스에 대한 이해, 업계에 대한 이해와 함께 프로젝트의 비즈니스 가치를 이해할 수 있는 역량과도 밀접한 관련이 있다”라고 말했다.

나이트는 자기 주장이 비협조적이거나 독단적이거나 공격적인 태도를 취하는 것이 아니며, IT 부서가 ‘아니오’ 부서로 여겨지던 시절로 돌아가는 것도 아니라고 말했다. 그는 “옳은 일에 자신을 투입하고 이를 전문적인 방식으로 수행하는 것이며, 문제에 대해 대화하자고 말하는 것이다. 그러기 위해서는 자신감, 즉 IT 기술과 비즈니스 기술에 대한 자신감이 필요하다”라고 언급했다.

나이트에 따르면 단호한 CIO는 예를 들어 비현실적인 프로젝트 기한이나 실행 불가능한 전략에 대한 요구를 자신 있게 밀어붙일 수 있으며, 커뮤니케이션과 영향력 있는 기술을 사용해 다른 사람들을 자신의 관점으로 전환시킬 수 있다. 

또한 그는 “이러한 CIO라면 지식을 활용해 요점을 전달하고 무엇이 효과가 없는지 설명하며, 다른 사람들에게 할 수 있는 경로와 추가 예산이나 시간 등 어떤 지원이 필요한지 보여주는 것을 두려워하지 않는다”라고 덧붙였다.

5. 다른 이들에 대한 믿음
또한 뛰어난 IT 리더는 다른 사람의 능력을 인정한다.

오랜 IT 임원이자 피닉스대학교의 CIO인 제이미 스미스는 이를 “사람을 긍정적으로 대하는 것”이라고 불렀다. 그는 “팀과 팀의 능력을 믿고 최고의 성과를 내도록 돕는 것”이라며 이를 위해 관리자와 경영진이 “전설의 체스 선수인 바비 피셔처럼 모든 체스 말을 옮길 것이 아니라 업무를 수행하는 팀이 문제를 잘 해결할 수 있다는 점을 이해해야 한다”라고 지적했다.

또한 스미스는 “IT 업무의 복잡성은 점점 더 커지고 있기 때문에 IT 관리자와 경영진이 더는 명령하고 통제하기 어렵다. 이를 인식하는 것이 누가 가장 성공할 수 있는 지에 대한 차별화 요소가 될 것”이라고 설명했다. 

그는 대학에서 CIO로 재직하던 초기, 데이터센터에서 클라우드로 마이그레이션하는 작업을 진행하다 시스템이 중단됐던 경험을 언급했다. 그는 “아직 비교적 익숙하지 않은 팀과 함께 있었는데, 그들은 계속해서 ‘20분만 더 달라’라고 말했다. 이때 ‘알겠다’라고 답해야만 했다. 그들을 믿는다는 것을 보여줬고, 덕분에 그들이 나를 신뢰하고 지지할 수 있었다”라고 말했다.

6. 사실이 부족할 때에도 내릴 수 있는 의사 결정
기술은 무서운 속도로 발전하고 있으며, IT는 물론 조직 전체가 이에 발맞춰 빠르게 움직일 수 있어야 한다.

스미스는 “오늘날의 리더가 되려면 확실한 정보 없이도 빠르고 복잡한 의사결정을 내리는 역량을 갖춰야 하며, 불확실한 환경에서 정보 없이 높은 수준의 판단을 할 수 있어야 한다”라고 말했다.

그는 이 부분을 설명하기 위해 생성형 AI 같은 신흥 기술을 둘러싼 상황을 예로 들었다. 기술이 시장에 출시될 때 제한된 정보로 좋은 전략을 수립한 CIO는 조직을 미래로 이끄는 데 성공한 반면, “결정을 내리기 전에 많은 세부 정보가 필요했던 사람들은 따라잡는 데 어려움을 겪고 있다”라고 스미스는 설명했다.

하지만 그는 좋은 결정을 빨리 내리는 것이 전부는 아니며 조치를 위해 적절한 안전망을 구축하는 것도 중요하다고 언급했다.

이를테면 스미스는 애자일 개발 원칙과 반복적인 전달을 통해 빠르게 결정하고 잠재적인 실패의 영향 범위를 최소화하는 CIO가 뛰어난 리더라고 말했다. 이러한 접근 방식을 통해 올인하지 않고도 학습하고 테스트할 수 있기 때문이다. 그는 “실험을 해보고 잘 안되면 다시 돌아올 수 있다”라며 이러한 전략이 사람들에게 IT 리더의 결정을 따를 수 있는 확신을 준다고 말했다.

7. 팀에 집중
연사, 컨설턴트, 저술가이자 베브케이앤코(BevKaye&Co)의 설립자인 베브 케이는 리더가 모든 시간을 자신에게만 집중하는 것이 아니라고 말했다.

케이는 리더가 자신이 이끄는 사람들을 알아가는 데에도 상당한 에너지를 소비한다고 설명했다. 이들은 무엇이 팀원 개개인에게 동기를 부여하고 무엇이 가장 중요한지 알고 있다. 또한 이들은 자신의 강점과 전략적 비전을 실현하는 데 가장 잘 기여하는 방법을 알고 있다.

케이에 따르면 리더는 기술 및 비즈니스 문제를 해결할 때와 마찬가지로 팀과의 관계 구축에도 호기심을 가져야 한다. 이러한 리더는 팀원들에게 추가 정보 및 자세한 내용을 요청하기 마련이다. 상사로서 이들은 팀원들의 생각을 더 잘 이해하기 위해 질문을 던지고, 이를 통해 팀원들을 더 잘 지원할 수 있다. 또한 바디 랭귀지나 회의실 분위기 등의 신호를 포착하고 사람들이 실제로 어떻게 느끼는지 파악하며, 잠시 회의를 멈춰 문제의 원인이 무엇인지 깨닫도록 도울 수 있다. 

케이는 “이 모든 것이 호기심과 관련이 있다. 이는 자신의 팀에 대한 호기심에서 비롯된다”라고 덧붙이면서, 오늘날 최고의 리더들이 자신의 학습 여정을 공유하고 성장을 돕거나 지켜본다고 말했다.

8. 호기심이 많으며 학습한 내용에 빠르게 적응
시구르드손은 뛰어난 IT 리더가 높은 IQ와 EQ(감성 지수)를 갖고 있을 뿐만 아니라 학습에 대한 열정도 있다고 말했다. 즉 그들에겐 높은 학습 지수(LQ)가 있다.

그는 성장 추구와 그에 따른 학습에 상응하는 변화 의지를 통해 IT 부서든 다른 부서든 관리자와 리더가 자신과 팀이 나아가야 할 목표와 목표를 달성하는 방법을 결정할 수 있다고 언급했다.

시구르드손은 “뒤처지지 않기 위해서는 EQ와 IQ 외에 평생 학습에 대한 노력이 중요하다”라며, IT 임원은 자신의 LQ와 커뮤니케이션 기술 및 영향력을 결합해 다른 사람들이 자신의 학습 과정을 따르도록 해야 한다고 말했다.

9. 변화에 긍정적인 관점
많은 IT 임원이 변화 관리 계획을 수립하고 실행할 수 있지만, 진정한 리더는 실제로 변화를 기회로 여기고 다른 사람들도 긍정적으로 볼 수 있도록 돕는다.

스미스는 “변화가 빠를수록 기회도 늘어난다. 최선의 노력에도 불구하고 항상 일이 잘 풀리는 것은 아니지만 그러한 장애물도 배우고 성장하는 기회가 될 수 있다는 사실을 믿어야 한다”라고 말했다.

그는 대부분의 리더십 특성과 마찬가지로 변화에 대한 이러한 관점이 자연스럽게 주어지는 것이 아니라 의도된 연습과 경험을 통해 얻어지는 것임을 인정했다. 하지만 그는 변화를 관리할 뿐만 아니라 변화를 포용하고 다른 사람들도 이를 따르도록 하는 역량을 키워야 진정한 리더십을 발휘할 수 있다고 말했다. 

반응형
반응형

https://devjorgecastro.medium.com/modern-android-development-in-2024-b70f194938bd


Hello everyone 👋🏻, we are kicking off a new year, and I don’t want to miss this chance to share with you an article titled Modern Android Developmentin its 2024 version. 🚀

If you missed my previous article, you can take a look at Modern Android Development in 2023 and review the changes for this year

Disclaimer

📝 This article reflects my personal opinions and professional insights, considering diverse viewpoints within the Android developer community. Additionally, I regularly review the guidelines presented by Google for Android.

🚨 It is crucial to emphasize that while I may not explicitly mention certain compelling tools, patterns, and architectures, this omission does not negate their potential as valuable alternatives for developing Android applications.

Use Kotlin everywhere ❤️

Kotlin is a programming language developed by JetBrains. Recommended by Google who officially announced it in May 2017 (see publication here). It is a modern programming language that has compatibility with Java and can run on the JVM, which has made its adoption in the development of Android applications very fast.

Whether you are new to Android or not, you should consider Kotlin as your first choice, don’t swim against the tide 🏊🏻 😎, Google announced this approach at Google I/O 2019. With Kotlin, you will be able to use all the features of a modern language, including the power of Coroutines and the use of modern libraries developed for the Android ecosystem.

Official kotlin documentation here

Kotlin is a multipurpose language that we can use not only for developing Android applications, although much of its popularity has been due to the latter, as we can see in the following graph.

KotlinConf ‘23

Kotlin 2.0 is here

Another important thing to highlight is the release of Kotlin 2.0, which is just around the corner. As of the article’s date, it’s in its version 2.0.0-beta3

The new K2 compiler is also another addition in Kotlin 2.0, which will bring significant performance improvements, accelerate the development of new language features, unify all platforms supported by Kotlin, and provide a better architecture for multiplatform projects.

Check out the recap of KotlinConf ’23 where you can find more information.

Compose 🚀

Jetpack Compose is Android’s recommended modern toolkit for building native UI. It simplifies and accelerates UI development on Android. Quickly bring your app to life with less code, powerful tools, and intuitive Kotlin APIs.

 Jetpack Compose documentacion

Jetpack Compose is part of the Android Jetpack library and uses the Kotlin programming language to easily create a native user interface. Also, it integrates with other Android Jetpack libraries, such as LiveData and ViewModel, to make it easier to build reactive and maintainable Android applications.

Some key features of Jetpack Compose include:

  1. Declarative UI.
  2. Customizable widgets.
  3. Easy integration with existing code (old view system).
  4. Live preview.
  5. Improved performance.

Resources:

Android Jetpack ⚙️

Jetpack is a suite of libraries to help developers follow best practices, reduce boilerplate code, and write code that works consistently across Android versions and devices so that developers can focus on the code they care about.

_ Android Jetpack documentation

Some of its most common tools are:

Material You / Material Design 🥰

Material You, a new customization feature introduced in Android 12 and implemented within Material Design 3, empowers users to tailor the visual appearance of their operating system to align with their personal preferences. This innovative addition complements Material Design, an adaptable system of guidelines, components, and tools crafted to uphold the highest standards of user interface design. Supported by open-source code, Material Design fosters seamless collaboration between designers and developers, enabling teams to efficiently create stunning products.

Currently, the last version for Material Design is 3, you can see more here. Furthermore, you can take advantage of Material Theme Builder as assistance in defining your application’s theme.


Splash screens API

The SplashScreen API in Android is essential to ensure that applications display correctly on Android 12 and later versions. Not updating can impact the application launch experience. It is crucial to quickly adopt this API for a consistent user experience on the latest versions of the operating system.


Clean Architecture

The concept of Clean Architecture was introduced by Robert C. Martin. It is based on the separation of responsibilities through the division of software into layers.

Characteristics

  1. Independent of Frameworks.
  2. Testable.
  3. Independent of UI.
  4. Independent of Database.
  5. Independent of any external agency.

The Dependency Rule

The dependency rule is described very well by the author in his piece, The Clean Code Blog

The overriding rule that makes this architecture work is The Dependency Rule. This rule says that source code dependencies can only point inwards. Nothing in an inner circle can know anything at all about something in an outer circle. In particular, the name of something declared in an outer circle must not be mentioned by the code in the an inner circle. That includes, functions, classes. variables, or any other named software entity.

 The Clean Code Blog

Clean Architecture in Android

  • Presentation: Activities, Composables, Fragments, View Models and others view components.
  • Domain: Use Cases, Entities, Repositories, others domain components.
  • Data: Repository implementations, Mappers, DTO’s, etc.

Architecture Patterns for Presentation Layer

An architecture pattern is a higher-level strategy that aims to help design a software architecture and is characterized by being a solution within a reusable framework for common architectural problems. Architectural patterns are similar to design patterns, but they are larger in scale and address more global issues such as the overall structure of the system, the relationships between components, and the way that data is managed.

Within the Presentation layer, we have some architecture patterns, of which I would like to highlight the following:

  • MVVM
  • MVI

I do not want to go into explaining each one because on the internet you find too much information about this. 😅

In addition, you can also see the guide to app architecture

Image by developer.android.com
 

Dependency Injection

Dependency injection is a software design pattern that allows a client to obtain its dependencies from an external source rather than creating them itself. It is a technique for achieving Inversion of Control (IoC) between objects and their dependencies.

Modularization

Modularization is a software design technique that allows you to divide an application into independent modules, each with its own functionality and responsibility.

Image by developer.android.com

Benefits of modularization

Reusability: By having independent modules, they can be reused in different parts of the application or even in other applications.

Strict visibility control: Modules enable you to easily control what you expose to other parts of your codebase.

Customizable delivery: Play Feature Delivery uses the advanced capabilities of app bundles, allowing you to deliver certain features of your app conditionally or on demand.

Scalability: By having independent modules, functionalities can be added or removed without affecting other parts of the application.

Ease of maintenance: By dividing the application into independent modules, each with its own functionality and responsibility, it is easier to understand and maintain the code.

Ease of testing: By having independent modules, they can be tested in isolation, which makes it easy to detect and fix errors.

Architecture improvement: Modularizing helps to improve the architecture of the application, allowing a better organization and structure of the code.

Improve collaboration: By having independent modules, developers can work on different parts of the application simultaneously and without interference.

Build Time: Some Gradle functionalities such as incremental build, build cache or parallel build, can leverage modularity to improve build performance.

See more in the official documentation.

Network

Serialization

In this section I would like to mention two important tools in my opinion: Moshi widely used in conjunction with Retrofit and Kotlin Serialization, the Kotlin team’s bet at JetBrains.

Moshi and Kotlin Serialization are two serialization/deserialization libraries for Kotlin and Java that allow you to convert objects to JSON or another serialization format and vice versa. Both provide a user-friendly interface optimized for use in mobile and desktop applications. Moshi primarily focuses on JSON serialization, while Kotlin Serialization has support for various serialization formats, including JSON.

Image Loading

To load an image from the internet, there are several third-party libraries available to help you handle the process. Image loading libraries do a lot of the heavy lifting for you; they handle both caching (so you don’t download the image multiple times) and networking logic to download the image and display it on screen.

_ Official Android Documentation

Reactivity / Thread Management

When it comes to reactive programming and asynchronous processes, Kotlin Coroutines stand out with their Suspension Functions and Flow. However, it is crucial to acknowledge the value of RxJava in Android application development. Despite the growing adoption of Coroutines and Flow, RxJava remains a robust and popular choice in multiple projects.

For new projects always choose Kotlin Coroutines❤️. Explore some Kotlin Coroutines Concepts


Local Store

An important point when building mobile applications is having the ability to persist data locally, such as some session data or cache data, among others. It is important to choose the right storage option based on the needs of your application. We could store unstructured data like key-value or structured data like a database. Keep in mind that this point does not mention all the types of local storage that we have available (such as file storage), only the tools that allow us to save data.

Suggestions:


Testing 🕵🏼

Testing in software development is essential to ensure product quality. It detects errors, validates requirements, and ensures customer satisfaction. Below are some of the most commonly used tools for this purpose:

Testing section of the Tools documentation

Screenshot testing 📸

Screenshot testing in Android involves automatically capturing screenshots of various UI elements in an application and comparing them against baseline images to detect any unintended visual changes. It helps ensure consistent UI appearance across different versions and configurations of the app, catching visual regressions early in the development process.


R8 optimizations

R8 is the default compiler that converts your project’s Java bytecode into the DEX format that runs on the Android platform. It is a tool that helps us to obfuscate and reduce the code of our application by shortening the names of the classes and their properties, eliminating unused code and resources within the project. To see more, check the Android documentation about Shrink, obfuscate, and optimize your app. Additionally, you can also disable certain tasks or customize R8’s behavior through ProGuard rules files.

Image by androidtopics.dipien.com
  • Code shrinking
  • Resource shrinking
  • Obfuscation
  • Optimization

Third-party tools

  • DexGuard

Play Feature Delivery

Google Play’s app serving model, called Dynamic Delivery, uses Android App Bundles to generate and serve optimized APKs for each user’s device configuration, so users download only the code and resources they need to run your app.

 Android Documentation

Adaptive layouts

Image by android-developers.googleblog.com

With the growth in the use of mobile devices with different form factors, we need to have tools that allow us to work with our Android applications adapted to different types of screens. That is why Android provides us with Window Size Classes, which, in a simple way, are three large groups of screen formats that mark critical points for us to develop our designs. With this we avoid the complexity of thinking about many screen designs to reduce our possibilities to 3 groups which are: Compat, Medium and Expanded.

Windows Size Classes

Image by developer.android.com

Support different screen sizes

Another important resource that we have are the Canonical Layouts, which are predefined screen designs that can be used for most scenarios in our Android applications and also show us a guide on how to adapt them to large screens.

Other related resources

Form-Factor Training

Localization 🌎

Localization involves adapting a product to meet the needs of diverse audiences in different regions. This includes translating text, adjusting formats, and considering cultural aspects. Its advantages include access to global markets, enhanced user experience, increased customer satisfaction, competitiveness in the global market, and compliance with local regulations.

Note: BCP 47 is a standard used by Android for internationalization

References

Performance 🔋⚙️

Image by android-developers.googleblog.com

While we develop applications for Android, we must ensure that the user experience is better, not only at the beginning of the application but also throughout its execution. For this reason, it is important to have tools that allow us to carry out a preventive analysis and constant monitoring of cases that may affect the performance of the application, so here is a list of tools that will help you with this purpose:

In-App Updates

When your users keep your app up to date on their devices, they can try new features, as well as benefit from performance improvements and bug fixes. Although some users enable background updates when their device is connected to an unmetered connection, other users might need to be reminded to install updates. In-app updates is a Google Play Core libraries feature that prompts active users to update your app.

The in-app updates feature is supported on devices running Android 5.0 (API level 21) or higher. Additionally, in-app updates are only supported for Android mobile devices, Android tablets, and Chrome OS devices.

 In-App Updates documentation

Image by developer.android.com

In-App Reviews

The Google Play In-App Review API lets you prompt users to submit Play Store ratings and reviews without the inconvenience of leaving your app or game.

Generally, the in-app review flow can be triggered at any time throughout the user journey of your app. During the flow, the user has the ability to rate your app using the 1 to 5 star system and to add an optional comment. Once submitted, the review is sent to the Play Store and eventually displayed.

To protect user privacy and avoid API misuse, there are strict guidelines that your app should follow about when to request in-app reviews and the design of the review prompt.

 In-App Reviews documentation

Observability 👀

Image taken from Elastic Blog

In an increasingly competitive app ecosystem, achieving a good user experience begins with ensuring that the app is bug-free. One of the best ways to ensure that the app is bug-free is to immediately detect issues as they arise and know how to start addressing them. Use Android Vitals to identify the areas of your app that have the most crashes and issues with responsiveness. Then, utilize custom crash reports in Firebase Crashlytics to get more details about the root causes in order to troubleshoot the issues effectively.

Tools

Accessibility

Image by fscl01.fonpit.de

Accessibility is an important feature in the design and construction of software that provides the ability for people with accessibility needs to use the application, in addition to improving their user experience. Some disabilities that this concept aims to improve are: people with vision problems, color blindness, hearing problems, dexterity problems, and cognitive disabilities, among others.

Considerations:

  • Increase text visibility (Color contrast, Resizable Text)
  • Use large, simple controls
  • Describe each UI element

Check Accessibility — Android doc.

Security 🔐

Image by android.com

Security is one, if not the most important aspect, that we must take into account when developing applications that protect the integrity of the device, the security of the data, and the trust of the user, which is why I list below a series of tips that will help you with this purpose.

  • Sign in your user with Credential Manager: Credential Manager is a Jetpack API that supports multiple sign-in methods, such as username and password, passkeys, and federated sign-in solutions (such as Sign-in with Google) in a single API, thus simplifying the integration for developers.
  • Encrypt sensitive data and files: Use EncryptedSharedPreferences and EncryptedFile.
  • Apply signature-based permissions: Use signature-based permissions when sharing data between apps you have control over.
<manifest xmlns:android="http://schemas.android.com/apk/res/android"
    package="com.example.myapp">
    <permission android:name="my_custom_permission_name"
                android:protectionLevel="signature" />
  • Do not put keys, tokens, or sensitive data required for your application’s configuration directly inside files or classes that are inside the project repository. Use local.properties instead.
  • Implement SSL Pinning: Use SSL Pinning to further secure communications between your application and remote servers. This helps prevent man-in-the-middle attacks and ensures that communication only occurs with trusted servers possessing a specific SSL certificate.

res/xml/network_security_config.xml

<?xml version="1.0" encoding="utf-8"?>
<network-security-config>
    <domain-config>
        <domain includeSubdomains="true">example.com</domain>
        <pin-set expiration="2018-01-01">
            <pin digest="SHA-256">ReplaceWithYourPin</pin>
            <!-- backup pin -->
            <pin digest="SHA-256">ReplaceWithYourPin</pin>
        </pin-set>
    </domain-config>
</network-security-config>
  • Implementa Runtime Application Self Protection (RASP): It is a security technique that protects applications at runtime against attacks and vulnerabilities. RASP works by monitoring the application’s behavior and detecting suspicious activities that could indicate an attack. some of the advantages that RASP provides us:

    - Code Obfuscation.
    - Root Detection.
    - Tampering/App Hook Detection.
    - Prevention of reverse engineering attacks.
    - Anti-Debugging Techniques.
    - Virtual Environment Detection.
    - Runtime Analysis of App Behavior.

Look at this article for more information: Runtime Application Self Protection techniques(RASP) in Android Apps. Also some Security guidelines by Android

Version Catalogs

Gradle provides a standard way to centrally manage project dependencies called the version catalog; it was experimentally introduced in version 7.0 and officially released in version 7.4.

Advantage:

  • For each catalog, Gradle generates type-safe accessors so that you can easily add dependencies with autocompletion in the IDE.
  • Each catalog is visible to all projects of a build. It is a central place to declare a version of a dependency and to make sure that a change to that version applies to every subproject.
  • Catalogs can declare dependency bundles, which are “groups of dependencies” that are commonly used together.
  • Catalogs can separate the group and name of a dependency from its actual version and use version references instead, making it possible to share a version declaration between multiple dependencies.

see more

Secrets Gradle Plugin

Google strongly recommends that you not check an API key into your version control system. Instead, you should store it in a local secrets.properties file, which is located in the root directory of your project but excluded from version control, and then use the Secrets Gradle Plugin for Android to read the API key.

Logger

A logger is a software tool used to register information about the execution of a program; important events, errors debug messages and other information that may be useful in diagnosing problems or understanding how a program is working. Loggers can be configured to write messages to different locations, such as a log file, to the console, to a database, or by sending the messages to a logging server.

Linter / Static Code Analyzer

Image taken from https://miro.medium.com/

Linter is a programming tool that is used to analyze the program source code to find potential problems or bugs in the code. These issues can be syntactic, inappropriate code style, lack of documentation, security issues, and so on, and they can have an impact on the quality and maintainability of the code.

Google Play Instant

Google Play Instant enables native apps and games to launch on devices running Android 5.0 (API level 21) or higher without being installed. You can build these types of experiences, called instant apps and instant games, using Android Studio. By allowing users to run an instant app or instant game, known as providing an instant experience, you improve your app or game’s discovery, which helps drive more active users or installations.

 Overview of Google Play Instant


New Design Hub

The Android team provides a new design hub to help create beautiful, modern Android apps, a centralized place to understand design for Android across multiple form factors.

d.android.com/design/ui


AI

Gemini and PalM 2, two state-of-the-art artificial intelligence (AI) models developed by Google, are poised to transform the landscape of Android application development. These models offer a range of benefits that will drive efficiency, user experience, and innovation in applications.

AI Coding Assistant Tools

Studio Bot

Studio Bot is your coding companion for Android development. It’s a conversational experience in Android Studio that helps you be more productive by answering Android development queries. It’s powered by artificial intelligence and can understand natural language, so you can ask development questions in plain English. Studio Bot can help Android developers generate code, find relevant resources, learn best practices, and save time.

 Studio Bot

Github Copilot

GitHub Copilot is an AI pair programmer. You can use GitHub Copilot to get suggestions for whole lines or entire functions right inside your editor.

Amazon CodeWhisperer

It is an Amazon service that generates code recommendations based on the context of your current code. It helps you write more efficient and secure code, and discover new APIs and tools.


Kotlin Multiplatform 🖥 📱⌚️ 🥰 🚀

Finally, and equally significant, the standout revelation of the year is Kotlin Multiplatform 🎉. It emerges as a formidable contender in the realm of cross-platform application development. While our primary focus may lie in Android app development, Kotlin Multiplatform offers us the flexibility to craft a fully native Android application leveraging the KMP framework. This strategic move not only future-proofs our projects but also equips us with the necessary infrastructure for a seamless transition to a multiplatform environment, should we choose to pursue it. 🚀

If you’re keen on delving deeper into Kotlin Multiplatform, I’d like to share a couple of articles I wrote a few months ago. In these pieces, I explore the current state of this technology and its implications for modern software development

반응형
반응형


지정 폴더안의 이미지 전부  텍스트 추출하기

# 파이썬 컴파일 경로가 달라서 현재 폴더의 이미지를 호출하지 못할때 작업디렉토리를 변경한다. 
import os
from pathlib import Path
# src 상위 폴더를 실행폴더로 지정하려고 한다.
###real_path = Path(__file__).parent.parent
real_path = Path(__file__).parent
print(real_path)
#작업 디렉토리 변경
os.chdir(real_path) 

"""_summary_
pip install pillow
pip install pytesseract


다운 받아야하는 학습된 한글 데이터 파일명: kor.traineddata
파일 위치: tesseract가 설치된 경로 C:\Program Files\Tesseract-OCR\tessdata

"""


from PIL import Image
import pytesseract  
import cv2 
import matplotlib.pyplot as plt

pytesseract.pytesseract.tesseract_cmd = r'C:\Program Files\Tesseract-OCR\tesseract.exe'
config = ('-l kor+eng --oem 3 --psm 11')
#config = ('-l kor+eng')
directory_base = str(real_path)+"./img/"  # 경로object를 문자열로 변경해서 합친다. 

        
# Open an image file
image_path = directory_base+"03_kor_eng.png"  # Replace with your image file path
img = Image.open(image_path)

# Use Tesseract to extract text
text = pytesseract.image_to_string(img, config=config)

print("Extracted Text:" + text)

image = cv2.imread(image_path)
rgb_image = cv2.cvtColor(image, cv2.COLOR_BGR2RGB)

plt.imshow(rgb_image)

# use Tesseract to OCR the image 
# text = pytesseract.image_to_string(rgb_image, lang='kor+eng')
text = pytesseract.image_to_string(rgb_image, config=config)
print(text)


if __name__ == "__main__":
     
    # List all files in the directory
    file_list = [f for f in os.listdir(directory_base) if os.path.isfile(os.path.join(directory_base, f))]

    # Print the list of files
    for file in file_list:
        print(file)
        # Open an image file
        image_path = directory_base + file  # Replace with your image file path
        img = Image.open(image_path)

        text = pytesseract.image_to_string(img, config=config)
        print("Extracted Text:")
        print(text)

[python] 이미지에서 텍스트 추출하기,  tesseract, OCR


반응형
반응형

프리랜서를 위한 종합소득세 신고 Q&A


4월 말이면 푸릇푸릇해지는 바깥 풍경과 함께 국세청으로부터 어김없이 안내문이 도착합니다. 5월을 맞이하여 종합소득세를 신고하라는 그 안내문 말이죠. 환급에 대한 기대로 마음이 설레는 건 잠깐, 종합소득세 신고 절차는 매번 어렵게 느껴지기만 합니다. 혼자 일하는 1인 사업자, 프리랜서의 자부심으로 종합소득세 신고도 혼자 해보려고 하는데, 막막하기만 하신가요? 프리랜서를 위한 맞춤형 종합소득세 정보 및 신고 방법을 Q&A로 알려드립니다.


Q. 프리랜서는 왜 종합소득세를 신고해야 하나요?
프리랜서라면 3.3%라는 숫자가 익숙하실 겁니다. 업체로부터 비용을 받을 때 항상 3.3%를 떼고 받기 때문이죠. 그런데 이 3.3%의 금액이 소득세라는 것, 알고 계셨나요? 정확히 3%는 소득세, 0.3%는 지방 소득세입니다.
이렇게 미리 세금을 떼는 걸 원천징수라고 하는데요. 원천징수란 나중에 세금을 내는 번거로운 절차를 거치는 대신 회사 측에서 임의로 지정된 3.3%의 세금을 미리 내주는 것입니다.
그리고 5월이 되면 과연 내가 미리 낸 세금이 진짜 내가 냈어야 하는 세금과 얼마나 차이가 나는지를 확인하는 것이 종합소득세 신고 과정입니다. 내 지난 연도의 총 수입과 비용, 그에 따른 소득, 그리고 내 여러 상황 등을 감안하여 각종 공제 등을 적용하여 최종 세액을 산출하는데요. 이 최종 세액보다 미리 3.3%로 낸 세금이 많으면 그 금액을 돌려받는 것이고, 미리 낸 세금이 더 적으면 세금을 더 내는 것입니다.


Q. 정확히 무엇에 대한 세금인가요?
직전연도 1월 1일부터 12월 31일까지 번 돈에 관한 세금입니다. 2023년 5월이라면 2022년 한 해의 수입에 관한 세금을 신고하는 것이죠. 좀 더 구체적으로 말하자면 작년 한 해 동안의 총 수입에서 사업에 필요한 지출(비용)을 빼고 계산한 (실질적인) 소득에 관한 세금입니다. 따라서 내가 작년에 총 얼마의 수입을 벌어들였고, 또 일 때문에 지출한 돈은 얼마이며, 그리하여 실질적으로 얻은 소득은 얼마인지를 신고하는 것이 종합소득세 신고의 핵심입니다.


Q. 언제까지 해야 하나요?
종합소득세 신고는 딱 5월 동안입니다. 5월 1일부터 5월 31일 사이에 종합소득세 신고를 마쳐야 합니다. 이 기간을 놓친 후에도 신고는 가능하지만 가산세가 발생하게 됩니다.


Q. 혼자서 종합소득세를 신고할 수 있나요?
수입 규모가 크고 소득 종류가 다양한 프리랜서가 아니라면 혼자서도 종합소득세를 신고할 수 있습니다. 다만 작년 소득이 2400만원 이하라면 신고가 조금 더 간편하고, 2400만원을 초과했다면 필요한 절차가 더 추가될 수 있습니다.


Q. 종합소득세 신고, 무엇부터 해야 하나요?
첫째, 작년의 내 총 수입부터 파악해야 합니다. 홈택스에 들어가서 국세청에 등록되어 있는 내 작년 수입이 내가 알고 있는 금액과 일치하는지, 누락된 수입은 없는지 확인해 보세요.
둘째, 경비를 확인해야 합니다. 경비란 일 때문에 지출하게 된 비용을 말하는데요. 이 비용을 총 수입에서 빼야 내 소득이 나오고, 이 금액을 기준으로 세금이 매겨집니다. 프리랜서가 인정 받을 수 있는 경비는 보통 장비 구입비, 교통비, 경조사비, 교육비, 거래처 접대비, 도서구입비, 사무용품비, 통신비 등이 있는데요. 장부를 작성하고 관련 자료를 제출하여 이 비용들을 입증하는 방법이 있고, 장부 없이 국세청이 정한 경비율을 적용하여 한번에 비용을 처리하는 방법이 있습니다.
셋째, 이제 수입과 경비, 소득을 파악하고 그에 따른 종합소득세 신고 절차의 중요 개념을 알았으니 내 신고 유형을 확인할 때입니다. 국세청에서 보내준 안내문이나 홈택스에 들어가서 내 신고 유형을 확인해보세요. 신고 유형을 보면 나는 단순경비율과 기준경비율 중 어떤 항목을 적용 받는지, 간편장부와 복식부기 중 어떤 방식으로 장부를 써야 하는지 등을 알 수 있는데요. 그에 따라 세금 신고 전략을 세워야 합니다.


Q. 단순경비율과 기준경비율은 또 뭔가요?
원칙적으로는 세금을 신고할 때 내가 일 때문에 지출한 돈을 하나하나 증명하여 비용으로 처리해야 합니다. 하지만 소득이 적거나 이를 증명할 수 있는 장부를 쓰지 않은 경우, 전체 수입 중 일정 비율을 간단히 계산하여 그만큼을 경비로 썼다고 추산해주는데요. 이 비율을 경비율이라고 합니다. 말 그대로 경비로 인정해주는 비율이죠. 경비율은 업종마다 세세하게 국세청이 그 비율을 다르게 정해놓아서 직접 확인해야 합니다.
경비율에는 단순경비율과 기준경비율 두 가지가 있습니다. 우선 단순경비율은 수입이 낮은 사람들에게 적용되며 비율이 비교적 높아 비용으로 처리할 수 있는 금액이 높아집니다. 그에 따라 실질 소득이 낮게 잡혀 세금도 낮아지죠. 단순경비율 대상자인 프리랜서라면 종합소득세를 혼자 신고하는 게 충분히 가능합니다.
반면 기준경비율은 비율 자체도 낮고 경비 항목 중 일부(기타 경비)에 대해서만 적용됩니다. 기준경비율 대상자는 매입비, 임차료, 인건비를 지출했더라도 이를 따로 입증해야만 이 비용을 경비로 뺄 수 있습니다. 더구나 사업자를 내지 않은 프리랜서의 경우 기준경비율 대상자라면 애초에 경비로 적용되는 금액도 적고, 매입비, 임차료, 인건비는 지출할 일이 잘 없어 경비로 뺄 수 있는 금액이 적은 경우가 대다수인데요. 이럴 경우 경비율을 적용하지 않고 장부로 직접 비용을 증명하여 경비를 인정받는 것이 유리할 때가 많으며, 이를 위해 세무 대리 서비스를 사용하는 게 더 이득일 수 있습니다.


Q. 주요 개념들을 알았으니 혼자 해볼게요. 어떻게 하면 되죠?
홈택스에 접속하여 [신고/납부] → [종합소득세] → [모두채움 신고/단순경비율 신고] 또는 [일반 신고]로 들어가면 종합소득세 신고가 시작됩니다. 차례차례 나오는 페이지를 따라 내 정보를 입력하고, 수입을 확인하고, 비용을 장부 또는 경비율로 처리하고, 적용 가능한 공제 또는 감면 혜택이 있는지 확인하고, 최종 산출 세액을 확인해보세요.
추가로 홈택스에서는 쉽게 종합소득세를 신고할 수 있도록 여러 서비스를 지원하고 있습니다. 특히 사업소득 원천징수가 이루어진 프리랜서 중 소득금액이 2400만원 이하일 경우 환급안내까지 해주는 납세자 친화형 서비스를 새롭게 시작하고 있으니 참고하세요.


Q. 세무 대리를 고민 중이에요. 괜찮을까요?
만약 신고 안내문에서 확인한 내 신고 유형이 기준경비율 대상자라면 세무 대리를 하는 것이 이득일 수 있습니다. 기준경비율 대상자는 경비율을 적용하는 것보다 장부를 제출하여 세금을 신고하는 것이 이득일 가능성이 높기 때문인데요. 장부 제출 시 간편장부라는 비교적 쉬운 장부를 쓰라고 국세청에서 정해줬더라도 비전문가에다 바쁜 프리랜서라면 그마저 쉽지 않습니다. 간편장부보다 더 어려운 복식부기를 써야 할 때는 물론이고, 장부를 쓰는 일부터 시작해 내게 가장 이득이 되는 절세 전략을 세워 세금을 찾아주는 세무사를 구해 신고를 마치는 게 더 현명한 판단일 수 있습니다.

반응형
반응형

pip install pytesseract


한글팩 : https://github.com/tesseract-ocr/tessdata/

 
다운 받아야하는 학습된 한글 데이터 파일명: kor.traineddata
파일 위치: tesseract가 설치된 경로 C:\Program Files\Tesseract-OCR\tessdata
 

*** 설치 할때 언어팩 선택 


pytesseract 0.3.10


Python-tesseract is an optical character recognition (OCR) tool for python. That is, it will recognize and “read” the text embedded in images.

Python-tesseract is a wrapper for Google’s Tesseract-OCR Engine. It is also useful as a stand-alone invocation script to tesseract, as it can read all image types supported by the Pillow and Leptonica imaging libraries, including jpeg, png, gif, bmp, tiff, and others. Additionally, if used as a script, Python-tesseract will print the recognized text instead of writing it to a file.

USAGE

Quickstart

Note: Test images are located in the tests/data folder of the Git repo.

Library usage:

from PIL import Image

import pytesseract

# If you don't have tesseract executable in your PATH, include the following:
pytesseract.pytesseract.tesseract_cmd = r'<full_path_to_your_tesseract_executable>'
# Example tesseract_cmd = r'C:\Program Files (x86)\Tesseract-OCR\tesseract'

# Simple image to string
print(pytesseract.image_to_string(Image.open('test.png')))

# In order to bypass the image conversions of pytesseract, just use relative or absolute image path
# NOTE: In this case you should provide tesseract supported images or tesseract will return error
print(pytesseract.image_to_string('test.png'))

# List of available languages
print(pytesseract.get_languages(config=''))

# French text image to string
print(pytesseract.image_to_string(Image.open('test-european.jpg'), lang='fra'))

# Batch processing with a single file containing the list of multiple image file paths
print(pytesseract.image_to_string('images.txt'))

# Timeout/terminate the tesseract job after a period of time
try:
    print(pytesseract.image_to_string('test.jpg', timeout=2)) # Timeout after 2 seconds
    print(pytesseract.image_to_string('test.jpg', timeout=0.5)) # Timeout after half a second
except RuntimeError as timeout_error:
    # Tesseract processing is terminated
    pass

# Get bounding box estimates
print(pytesseract.image_to_boxes(Image.open('test.png')))

# Get verbose data including boxes, confidences, line and page numbers
print(pytesseract.image_to_data(Image.open('test.png')))

# Get information about orientation and script detection
print(pytesseract.image_to_osd(Image.open('test.png')))

# Get a searchable PDF
pdf = pytesseract.image_to_pdf_or_hocr('test.png', extension='pdf')
with open('test.pdf', 'w+b') as f:
    f.write(pdf) # pdf type is bytes by default

# Get HOCR output
hocr = pytesseract.image_to_pdf_or_hocr('test.png', extension='hocr')

# Get ALTO XML output
xml = pytesseract.image_to_alto_xml('test.png')

Support for OpenCV image/NumPy array objects

import cv2

img_cv = cv2.imread(r'/<path_to_image>/digits.png')

# By default OpenCV stores images in BGR format and since pytesseract assumes RGB format,
# we need to convert from BGR to RGB format/mode:
img_rgb = cv2.cvtColor(img_cv, cv2.COLOR_BGR2RGB)
print(pytesseract.image_to_string(img_rgb))
# OR
img_rgb = Image.frombytes('RGB', img_cv.shape[:2], img_cv, 'raw', 'BGR', 0, 0)
print(pytesseract.image_to_string(img_rgb))

If you need custom configuration like oem/psm, use the config keyword.

# Example of adding any additional options
custom_oem_psm_config = r'--oem 3 --psm 6'
pytesseract.image_to_string(image, config=custom_oem_psm_config)

# Example of using pre-defined tesseract config file with options
cfg_filename = 'words'
pytesseract.run_and_get_output(image, extension='txt', config=cfg_filename)

Add the following config, if you have tessdata error like: “Error opening data file…”

# Example config: r'--tessdata-dir "C:\Program Files (x86)\Tesseract-OCR\tessdata"'
# It's important to add double quotes around the dir path.
tessdata_dir_config = r'--tessdata-dir "<replace_with_your_tessdata_dir_path>"'
pytesseract.image_to_string(image, lang='chi_sim', config=tessdata_dir_config)

Functions

  • get_languages Returns all currently supported languages by Tesseract OCR.
  • get_tesseract_version Returns the Tesseract version installed in the system.
  • image_to_string Returns unmodified output as string from Tesseract OCR processing
  • image_to_boxes Returns result containing recognized characters and their box boundaries
  • image_to_data Returns result containing box boundaries, confidences, and other information. Requires Tesseract 3.05+. For more information, please check the Tesseract TSV documentation
  • image_to_osd Returns result containing information about orientation and script detection.
  • image_to_alto_xml Returns result in the form of Tesseract’s ALTO XML format.
  • run_and_get_output Returns the raw output from Tesseract OCR. Gives a bit more control over the parameters that are sent to tesseract.

Parameters

image_to_data(image, lang=None, config='', nice=0, output_type=Output.STRING, timeout=0, pandas_config=None)

  • image Object or String - PIL Image/NumPy array or file path of the image to be processed by Tesseract. If you pass object instead of file path, pytesseract will implicitly convert the image to RGB mode.
  • lang String - Tesseract language code string. Defaults to eng if not specified! Example for multiple languages: lang='eng+fra'
  • config String - Any additional custom configuration flags that are not available via the pytesseract function. For example: config='--psm 6'
  • nice Integer - modifies the processor priority for the Tesseract run. Not supported on Windows. Nice adjusts the niceness of unix-like processes.
  • output_type Class attribute - specifies the type of the output, defaults to string. For the full list of all supported types, please check the definition of pytesseract.Output class.
  • timeout Integer or Float - duration in seconds for the OCR processing, after which, pytesseract will terminate and raise RuntimeError.
  • pandas_config Dict - only for the Output.DATAFRAME type. Dictionary with custom arguments for pandas.read_csv. Allows you to customize the output of image_to_data.

CLI usage:

pytesseract [-l lang] image_file

INSTALLATION

Prerequisites:

  • Python-tesseract requires Python 3.6+
  • You will need the Python Imaging Library (PIL) (or the Pillow fork). Under Debian/Ubuntu, this is the package python-imaging or python3-imaging.
  • Install Google Tesseract OCR (additional info how to install the engine on Linux, Mac OSX and Windows). You must be able to invoke the tesseract command as tesseract. If this isn’t the case, for example because tesseract isn’t in your PATH, you will have to change the “tesseract_cmd” variable pytesseract.pytesseract.tesseract_cmd. Under Debian/Ubuntu you can use the package tesseract-ocr. For Mac OS users. please install homebrew package tesseract.
  • Note: In some rare cases, you might need to additionally install tessconfigs and configs from tesseract-ocr/tessconfigs if the OS specific package doesn’t include them.
Installing via pip:

Check the pytesseract package page for more information.

pip install pytesseract
Or if you have git installed:
pip install -U git+https://github.com/madmaze/pytesseract.git
Installing from source:
git clone https://github.com/madmaze/pytesseract.git
cd pytesseract && pip install -U .
Install with conda (via conda-forge):
conda install -c conda-forge pytesseract

TESTING

To run this project’s test suite, install and run tox. Ensure that you have tesseract installed and in your PATH.

pip install tox
tox

반응형
반응형


https://www.theverge.com/2024/1/29/24055011/meta-llama2-code-generator-generative-ai


삽화: Alex Castro / The Verge

코드 생성 AI 모델인 Code Llama 70B 에 대한 Meta의 최신 업데이트는 아직까지 "가장 크고 성능이 뛰어난 모델"입니다. Code Llama 도구는 8월에 출시되었으며 연구 및 상업용 모두 무료입니다. Meta의 AI 블로그 게시물에 따르면 Code Llama 70B는 이전 버전보다 더 많은 쿼리를 처리할 수 있습니다. 이는 개발자가 프로그래밍하는 동안 더 많은 프롬프트를 제공할 수 있고 더 정확할 수 있음을 의미합니다.

Code Llama 70B는 HumanEval 벤치마크에서 정확도 53%를 기록하여 GPT-3.5의 48.1%보다 나은 성능을 보였고 GPT-4에 대해 보고된 OpenAI 문서 (PDF) 의 67%에 더 가깝습니다 .


Llama 2를 기반으로 구축된 Code Llama는 개발자가 프롬프트에서 코드 문자열을 생성하고 사람이 작성한 작업을 디버깅하는 데 도움이 됩니다. Meta는 지난 가을에 특정 코딩 언어에 초점을 맞춘 두 가지 다른 Code Llama 도구인 Code Llama - Python과 Code Llama - Instruct를 동시에 출시했습니다.

Code Llama 70B는 세 가지 버전의 코드 생성기에서 사용할 수 있으며 연구 및 상업적 용도로는 여전히 무료입니다. 대규모 모델은 1TB의 코드 및 코드 관련 데이터에 대해 학습되었습니다. AI 모델을 실행하기 위해 GPU에 대한 액세스를 제공하는 코드 저장소 Hugging Face에서 호스팅됩니다.

Meta는 자사의 대형 모델인 34B 및 70B가 "최고의 결과를 반환하고 더 나은 코딩 지원을 제공합니다"라고 말했습니다.

다른 AI 개발자들은 작년에 코드 생성기를 출시했습니다. Amazon의 CodeWhisperer는 4월에 출시되었으며 Microsoft는 OpenAI의 모델을 활용하여 GitHub Copilot을 출시했습니다 

반응형

+ Recent posts