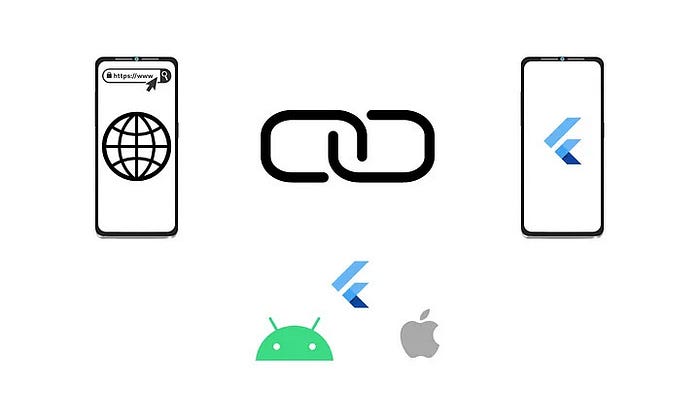
Deeplink in Flutter means the ability to open a specific page or perform a specific action within your app by clicking on a link from another app or a web page. It allows users to navigate to specific pages or sections of your app like cart, orders, or any product information, etc. Deeplink in Flutter is a very good feature for all developers and users. Flutter supports deep linking on iOS, Android, and web browsers. Implementing deep linking in Flutter apps enhances the user experience and makes it easier for users to navigate directly to specific sections.
Introduction
Deep linking is a crucial feature in mobile app development that enables smooth navigation to specific sections of different apps. This is very useful for users to access relevant content or perform specific tasks without manually navigating through the app’s screens. This deep linking feature eliminates the need for users to search for or manually locate the desired information within the app. Deep linking is a useful functionality for apps like e-commerce apps, content-driven apps, and social media platforms. By using deep links in Flutter, we can connect with other apps and services making it a good digital ecosystem.
Understanding Deep Links in Flutter
DeepLinks in Flutter means you have URLs or URIs to navigate or perform specific actions within a Flutter app. It directly helps users to access specific screens or content like webpages, screens, and notifications.
There are some concepts and terms that should be known to developers for using deep links in the Flutter applications.
URL Scheme-
A URL scheme is a unique identifier that identifies your app and allows it to handle specific deep links. It is generally a link to view or see a particular product in an e-commerce app.
Universal Links (iOS) and App Links (Android):
These are platform-specific mechanisms that help deep linking to work smoothly between web content and apps. These help in directly opening the content of the app, if the app is installed on the device, or fall back to the web page if the app is not present.
Deep Link Handling:
We need to handle the logic for deep lonks in Flutter like capturing the link URL and getting important data such as parameters or query strings. This captured information helps in navigating to a particular screen or performing the actions.
Implement Deep Linking on Android
To use deep links in your Flutter applications, we must have links for redirection that can be instantiated by adding intent filters for the incoming links.
In Android, we have two types of Uni Links, which are approximately the same as the meaning.
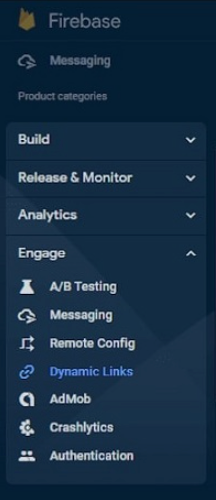
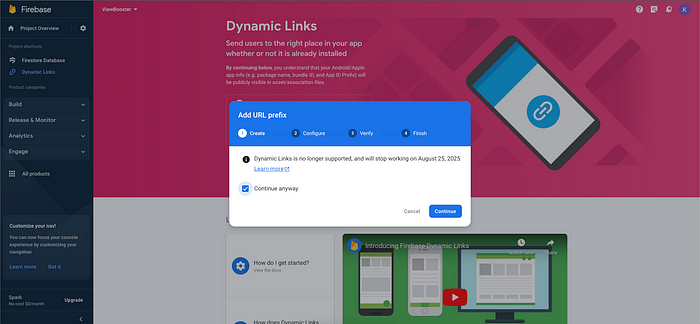
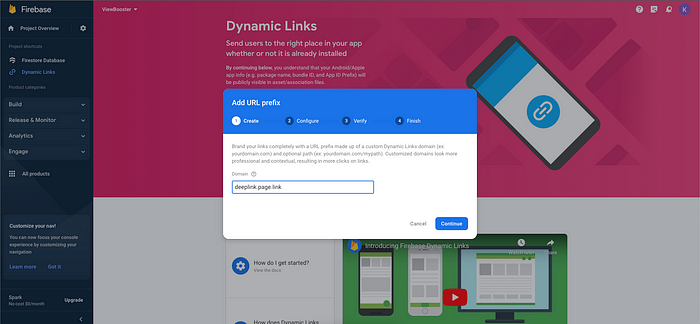
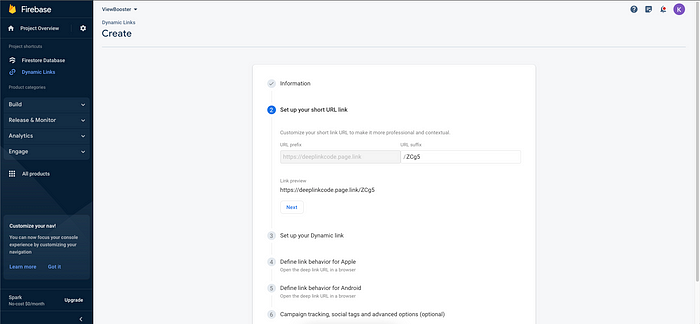
Open the DynamicLink section in firebase
On a domain that you may customize by adding your own name, company name, trademark, etc., dynamic links are generated. More relevant links that have been customized appear. After displaying this window, click Finish.
Now, on the newly opened page, select the “New Dynamic link” button.
Click on the new dynamic link button.
App Links-
App Links are the same as deep links, but it does require a specified host, i.e. a hosted file and along with this, the app links only tend to work with the HTTPS scheme.
You need to add the following code to your AndroidManifest file for adding deep links in Flutter. There you have to define an intent-filter and you can change the host with your need.
<!-- This is for App Links -->

<meta-data
            android:name="flutter_deeplinking_enabled"
            android:value="true" />

      <intent-filter android:autoVerify="true">
        <action android:name="android.intent.action.VIEW" />
        <category android:name="android.intent.category.DEFAULT" />
        <category android:name="android.intent.category.BROWSABLE" />
        <!-- Accepts URIs that begin with https://YOUR_HOST -->
        <data
          android:scheme="http"
          android:host="deeplink.example.com" />
            <data android:scheme="https" />
      </intent-filter>
Deep Links-
Deep links are the links in Android, which don’t require a specified host or any other custom scheme.
As discussed above, we have to paste for Deep links and we can change the host and scheme accordingly.
<!--  This is for Deep Links -->
<intent-filter>
<action android:name="android.intent.action.VIEW" />
<category android:name="android.intent.category.DEFAULT" />
<category android:name="android.intent.category.BROWSABLE" />
<!-- Accepts URIs that begin with YOUR_SCHEME://YOUR_HOST -->
<data android:scheme="blog" android:host="deeplink.example" />
</intent-filter>
We can use any of the intent filters in the AndroidManifest.xml file.
Theintent filteris a statement in the manifest file that specifies what intent or component will be received on the app side, according to native app implementation. When an action occurs, it can specify additional actions that should be taken on this intent filter.
Datais what the URI format, which primarily resolves to the activity, represents. Also, a data tag must have theandroidattribute.
Acategoryis mainly the type of intent-filter category. We have definedBROWSABLEin the category, which means that the intent filter can be accessed from the browser, and if not added, it will not be browsed.
Implement Deep Linking on iOS
In iOS also, we have two types of links-
Universal Links:
Universal links are those links that require a specified host or a custom scheme in their app. It works only with the HTTPS scheme. Below is the defined example of a universal link.
For setting up Universal Links we need to follow some steps-
Enable Associated Domains in your app’s entitlements.
Set up a unique URL identifier for your app.
Set up a JSON file on your website that contains information about your app’s URL identifier.
Enable Associated Domains
Creating the entitlements file in Xcode:
Open up Xcode by double-clicking on your ios/Runner.xcworkspace file.
Go to the Project navigator (Cmd+1) and select the Runner root item at the very top.
Select the Runner target and then the Signing & Capabilities tab.
Click the + Capability (plus) button to add a new capability.
Type “associated domains” and select the item.
Double-click the first item in the Domains list and change it from webcredentials.com to: applinks: + your host (ex: my-blogs.com). A file called Runner.entitlements will be created and added to the project.
<?xml version="1.0" encoding="UTF-8"?>
<!DOCTYPE plist PUBLIC "-//Apple//DTD PLIST 1.0//EN" "http://www.apple.com/DTDs/PropertyList-1.0.dtd">
<plist version="1.0">
<dict>
<!-- ... other keys -->
<key>com.apple.developer.associated-domains</key>
<array>
  <string>applinks:[YOUR_HOST_HERE]</string>
</array>
<!-- ... other keys -->
</dict>
</plist>
Custom URL:
In Custom URL, we don’t need a host or a custom scheme for our iOS app. An example of a custom URL is defined below. We need to add the host and scheme in the ios/Runner/Info.plist file.
There are two ways your app will receive a link — from a cold start and brought from the background.
ATTENTION-
getInitialLink/getInitialUri should be handled ONLY ONCE in your app’s lifetime, since it is not meant to change throughout your app’s life
Once we are done with the Universal Links set up for our app, we will need to handle the links within our Flutter app. To do this, we need to use theuni_linkspackage. Add this dependency in pubspec.yaml file and pub get it.
uni_links: ^0.5.1
Now, we just need to register a callback to handle incoming deep links.
import 'package:uni_links/uni_links.dart';

void main() {
   // Initialize the deep link handler
   initUniLinks();
   runApp(MyApp());
}

void initUniLinks() async {
   // Ensure that the app is ready to handle deep links
   await getInitialUri();

   // Set up a stream subscription to handle deep links when the app is running
   uriSubscription = uriLinkStream.listen((Uri uri) {
      // Handle the deep link here
      handleDeepLink(uri);
   });
}

void handleDeepLink(Uri uri) {
   // Process the deep link URI and navigate accordingly
   // You can extract parameters or perform specific actions based on the deep link data
}
Advanced Usage
Some additional features enhance the capabilities of deep linking in our Flutter app. These features help in creating more personalized and smooth user experiences, tracking user engagement, optimizing marketing efforts, and improving overall app performance.
Deep Link Analytics-
By implementing Deep Link Analytics, we can track and analyze user engagement with deep links. We can get the data on the number of clicks, conversions, and user behavior after accessing the app through a deep link. With this information, we can get to know about our deep links and can do some optimization if needed.
Deferred Deep Linking-
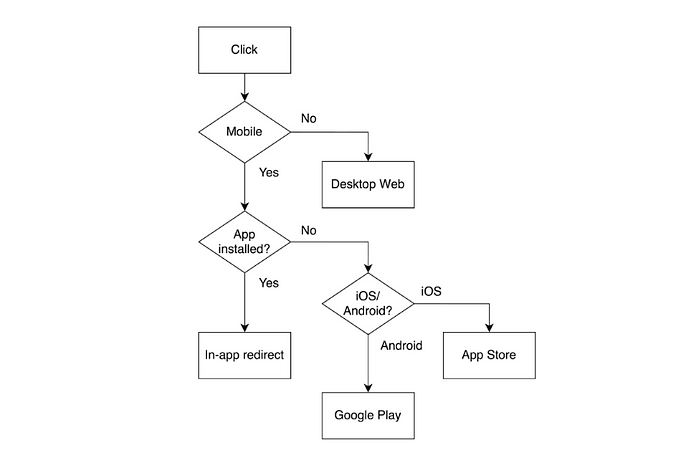
This helps in handling the scenarios, where the app is not installed on the user’s device on clicking the deep link. In these cases, the user is redirected to the app store to download the app and after installation, the app can open and handle the deep link that triggered the installation.
Dynamic Deep Links-
These help in generating deep links programmatically with dynamic parameters. It means we can generate deep links that include user-specific data, product IDs, or other variables.
Deep Link Attribution-
By using this you can track the source of each deep link and can know which channels are getting more engagement and conversions.
Deferred App Deep Linking-
Some platforms handle deep links when the app is already installed but not in the foreground. But this feature works even if the app is in the background or not currently running.
Example App
Let us understand this through a code. In the AndroidManifest.xml file, I have declared my link like — blog://deeplink.example
We will declare the function main.dart file like this.
We will open this app through the deeplink shown below. We will paste the same link(blog://deeplink.example) in the browser and it will show us the APP NAME of that app and will navigate us to the app by clicking on continue
Conclusion
Deep links help in seamless navigation to specific screens from external sources like the web, notifications, etc.
By using deep links, users are more engaged and satisfied. This also helps users to users to access relevant and personalized content.
Deep links provide cross-platform compatibility like for both iOS and Android.
Deep links can be customized with parameters or query strings, allowing for dynamic and personalized experiences based on user-specific data.
We can test and analyze deep links, also we can track user behavior, and optimize our app’s deep linking strategy.
By using deep links in Flutter, we can interact with other apps, services, or platforms. Also, we can collaborate and share the data.
Visual Studio Codeis undoubtedly the most popular code editor today. It is lightweight code editor developed by Microsoft for Windows, Linux and macOS. It includes various features such as syntax highlighting, debugging, intelligent code completion, snippets, embedded Git, code refactoring and many more. VS Code provides better performance and stability compared to other code editors in the market.
Microsoft has huge market place for VS Code where developers able to get third party plugins and extensions, availing VS Code more rich and efficient. Today we are discussing top 11 plugins for VS Code which provides invaluable to the speed and quality to your projects.
In this guide, we’ll explore the following extensions.
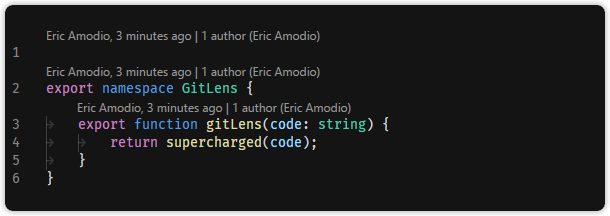
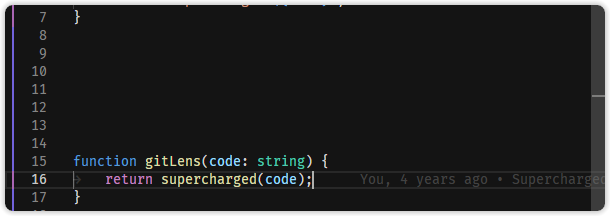
GitLens supercharges the Git capabilities. GitLens helps you to understand code better. This powerful and feature rich tool helps to quickly look into code changes such as who, why, and when a line or code block was changed. You are able to find code history to gain further insights as to how and why the code evolved. With this tools, you can effortlessly explore the history and evolution of a codebase.
Here are just some of the unique features GitLens provides,
Effortlessrevision navigation(backwards and forwards) through the history of a file
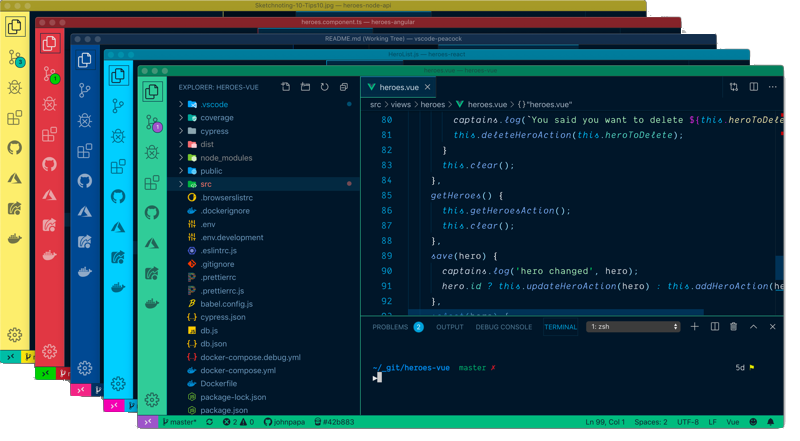
Developers love to open multiple windows of VS Code as they work on more than one projects at the same time. For example, both backend and front end project could be opened in two separate VS Code instances and developers might want move from one project to another. Using this extension developers able to change the color of each project windows, so that it can be quickly identify which project or repo they are working.
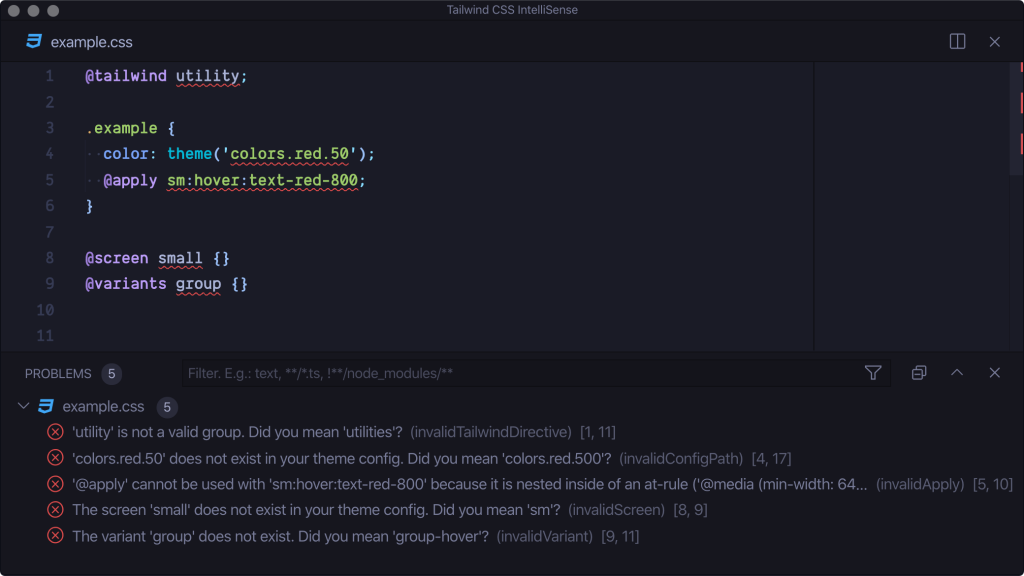
TailwindCSS is a utility-first CSS framework that has been gaining huge attention among the web developers. If you love Tailwind CSS then this is a must have extension to have. It is a free extension, published by Tailwind Labs (bradlc). This extension provides autocomplete, syntax highlighting, and linting for Tailwind classes. With this extension, developers don’t need to memorize the exact spelling of all the utility classes or to spend the time typing them out.
Linting highlights errors and potential bugs in both your CSS and your markup. It is the process of checking the source code for Programmatic as well as Stylistic errors.
In order for the extension to activate you must have tailwindcss installed and a Tailwind config file named tailwind.config.js or tailwind.config.cjs in your workspace.
As our functions get more complex, it becomes more challenging to keep track of opening and closing brackets such as parentheses and curly braces.
We can use a VS Code extension called Bracket Pair Colorizer to add color to each set of opening and closing brackets, making it easier to identify each set of brackets.
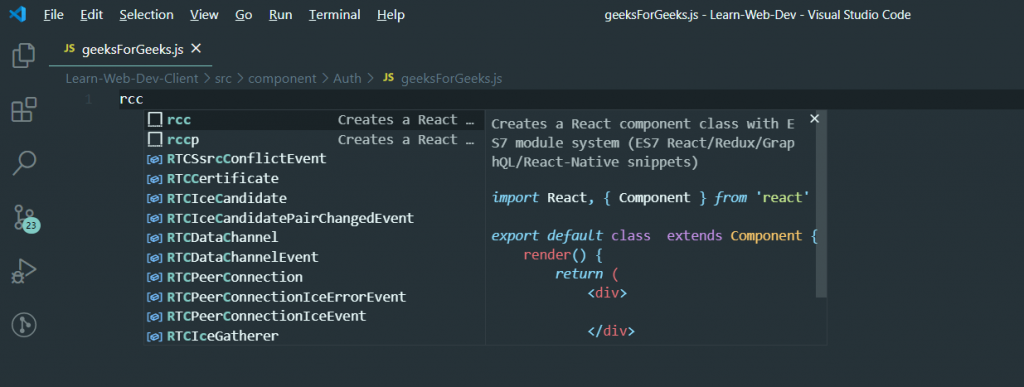
If you are a true React JS developer then this is a must have snippet for you, because it simply does just right for you. This plugin provides you JavaScript and React/Redux snippets in ES7 with Babel plugin features for VS Code.
Developers have different opinions on how to format the code structure so it would be readable.Prettierwas created as a means of alleviating this challenge and ensures one unified code format within the development team.
Prettier reformats your JavaScript code consistently so that it make easy to read and understand the code. This plugin helps to format spacing, variable declarations, semi-colons, trailing commas and much more.
You can configure Prettier to format your files when saving them or committing them to a version control system (e.g. Git, SVN). This way, you do not have to worry about your source code formatting and Prettier takes care about it.
Most of the tags in HTML/XML need a corresponding closing tag. When writing large applications which consists of thousands and sometime millions of lines of code, the corresponding closing tags might located at very bottom of the editor, where developers has to scroll hundreds and thousand of lines below. It is tedious if you want to rename the tags.
Auto Rename Tag provides us with a feature that when we change the starting tag it will automatically rename paired HTML/XML tag, same as Visual Studio IDE does, making the renaming of tags easier.
You can simply install the plugin using VS code Extensions. After installation, Add entry into auto-rename-tag.activationOnLanguage to set the languages that the extension will be activated. By default, it is [“*”] and will be activated for all languages.
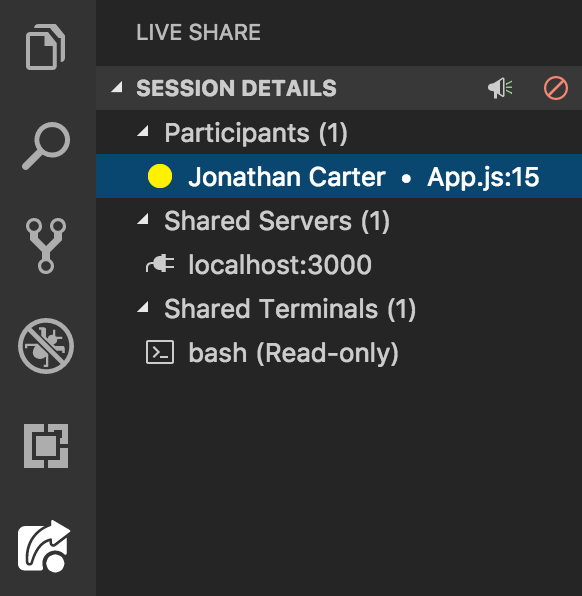
Another great contribution by Microsoft. Live Share enables you to collaboratively edit and debug code with other developers in real time. Using this tools, pair programming has become more convenient, where developers can instantly and securelyshare the project with other developers.
It shares all of their editor context meaning, other developers do not worry about cloning any repos or SDKs installation for code review and debugging process.
Download and install the Visual Studio Live Share extension for Visual Studio Code. If you want to integrated voice calling, then install the VS Live Share Extension Pack, which includes both the Live Share and Live Share Audio extensions.
Let Visual Studio Live Share to finish installing dependencies.
Once complete, you’ll see Live Share appear in your status bar. You can now begin collaborating with others immediately!
Quickstart (Joining)
Click the session URL the “host” sent you, which will open it up in a browser. When prompted, allow your browser to launch VS Code
You’ll be asked to sign in the first time you share (using a GitHub or Microsoft account), which allows others to identity you when collaborating.
That’s it! After you join, you’ll be immediately presented with the file that the “host” has open, and can see their cursor and any edits they make. Additionally, you start out “following” the host, so as they scroll or navigate between files, you’ll follow along with them. This makes it easy to orient yourself with the issue/question/task you’re about to start collaborating on.
Having descriptive icons help you differentiate between files and folders in the project. Having icons in your project make more interesting and attractive. Below diagram depict different between two VS Code tabs with One having icons, the other does not.
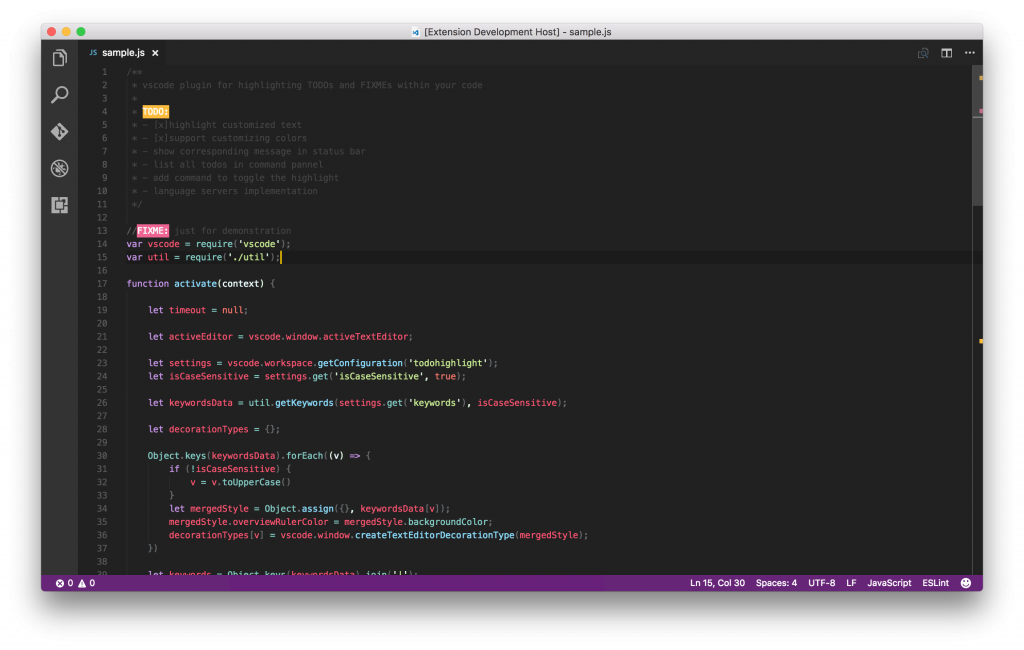
This plugin lets you to highlight TODO, FIXME and other annotations within your code. This is really a useful plugin for highlighting comments such as NOTE: , TODO: , DEBUG:. The customization settings are also quite extensive making it perfect for the developer, thus leading level up your comments on any project.
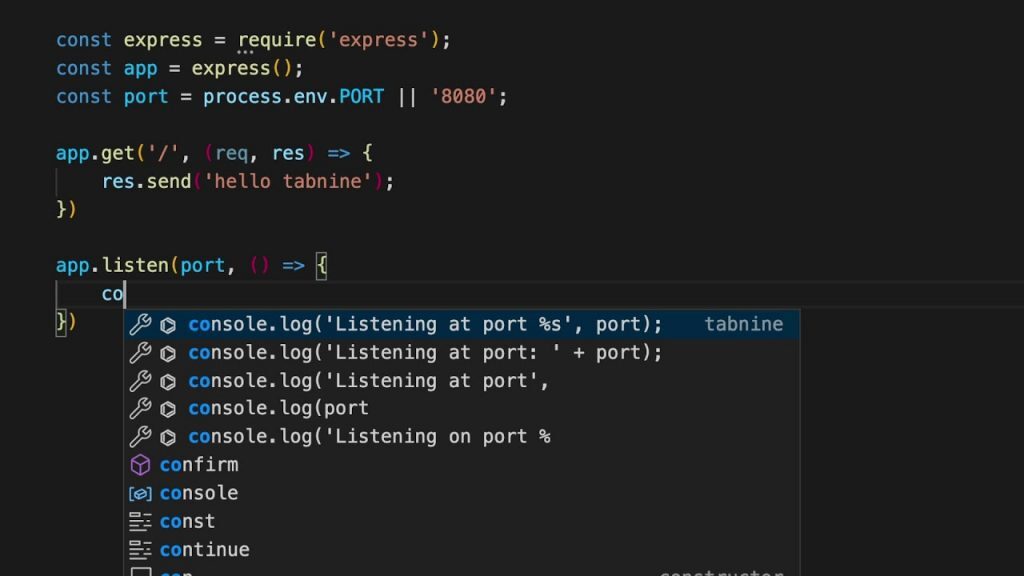
Tabnine is the AI code completion assistant already trusted by millions of developers to amplify coding accuracy and boost productivity. Whether you are a new dev or a seasoned pro, working solo or part of a team, Tabnine AI assistant will suggest team-tailored code completions in most popular coding languages and all your favorite IDEs.
Tabnine is powered by sophisticated machine learning models.It is trained on more than a billion lines of open-source codefrom GitHub.
Tabnine suggests and predicts code as you write. This powerful extension speed up your development, save you tons of time and cutting your coding time in half. Currently it support almost all the popular programming languages including Python, Javascript, Java andReact.
Tabnine’s Team Learning Algorithm studies your team’s code, preferences, and patterns, continuously learning and adapting. Every interaction with a team member amplifies code completion accuracy.
Installation and Configuration
Press Cmd+P (mac) or Ctrl+P (Windows) in your Visual Studio Code, type ext install Tabnine.tabnine-vscode and press Enter
Click the Reload button in the extensions tab
The default behavior of Tabnine uses the Enter key to accept completions. If you would rather use the Enter key to start a new line, go to Settings → Editor: Accept Suggestion On Enter and turn it off.
Conclusion
In this article, we reviewed 11 VS Code extensions that can help to make you a better programmer and boost your productivity. There are many more other cool extensions that we need to explore in future, so If we have time then will definitely look into those extensions in the coming articles.
Navigating the vast realm of app development, choosing the best Flutter IDE can be a game-changer. Integrated Development Environments (IDEs) are more than just tools; they are the backbone that streamlines the coding process, ensuring flawless execution and enhanced productivity.
Especially when it comes to Flutter, a leading framework in today’s digital ecosystem, having the best IDE for web development elevates the developer’s experience to new heights.
Understanding Flutter and Integrated Development Environments Flutter, an open-source UI software development toolkit birthed by Google, has swiftly risen as a dominant force in mobile app development. With its unique ability to craft high-fidelity, natively compiled applications for multiple platforms from a single codebase, Flutter presents developers with unparalleled flexibility and efficiency. Its vibrant widget-centric approach, paired with the Dart language, promises robust and visually appealing applications, be it for mobile, web, or desktop.
Integrated Development Environments (IDEs) serve as the crucible where the magic of Flutter comes alive. These sophisticated platforms offer a consolidated workspace, combining essential tools like code editors, debuggers, and compilers. In the context of Flutter, the right IDE can simplify the coding process, provide real-time feedback, and automate repetitive tasks. By easing navigation, highlighting errors, and offering intelligent code completion suggestions, IDEs empower developers to harness the full potential of Flutter, ensuring smooth and efficient project outcomes.
Key Considerations When Choosing a Flutter IDE Here are some key things that you need to consider before pitching for the best Flutter IDE:
1. Hardware and Software Compatibility:
Flutter IDE for Android: Ensure support for Android emulators and tools specific to the Android ecosystem. Flutter IDE for Windows: Must be optimized for Windows with seamless integration of its features. 2. Performance and Speed of the IDE:
Opt for an IDE that is agile and responsive. The speed at which it can compile, run, and debug Flutter code is pivotal in enhancing development efficiency.
3. Availability of Support and Community Plugins/Extensions:
A robust library of plugins and extensions, backed by an active community, can be game-changing. These additions can introduce functionalities, streamline specific processes, or offer tools tailored to niche requirements.
4. Cost Factors and Licensing:
Sometimes, premium IDEs, despite an upfront cost, can offer unparalleled features, superior support, and regular updates. It’s also crucial to understand the licensing agreements. Some might be free for personal use but require payment for commercial projects.
Best Flutter IDEs For App Development VS Code Visual Studio, often dubbed the titan of IDEs, is Microsoft’s premier development environment, revered for its adaptability across various programming landscapes. For Flutter enthusiasts, it unfolds as a haven, integrating seamlessly with the framework and facilitating an optimized coding experience, ensuring rapid, efficient app development.
Features Seamless integration with Git: No more hopping between platforms. Visual Studio embeds Git functionality within, streamlining version control and ensuring smooth code management. Live Share: Elevate the collaborative experience with real-time coding sessions. Whether you’re mentoring a junior developer or debugging with a colleague across the globe, Live Share makes it effortless. IntelliCode: Leveraging artificial intelligence, IntelliCode revolutionizes coding with predictive suggestions. It not only speeds up the development process but also reduces the chances of errors. Extensive extensions marketplace: Personalize your Flutter web development experience. With a vast repository of extensions like the Pieces for Developers VS Code extension, you can add tools, themes, and languages tailored to your needs. Integrated debugging tools: Dive deep into your code with precision. Visual Studio’s debugging suite is adept at swiftly identifying and rectifying anomalies, ensuring your Flutter apps run flawlessly. Android Studio Android Studio stands as the official IDE for Android development. Its stature is further elevated when it collaborates with Flutter, offering an ecosystem that is both intuitive and powerful. For developers diving into the Flutter world, Android Studio becomes a natural ally, bringing Google’s native Android expertise and fusing it with Flutter’s dynamic capabilities.
Features Emulator with real-time preview: Say goodbye to guesswork. With its integrated emulator, developers can see changes in real time, ensuring the app looks and functions as intended. Full suite of profiling tools: Dive deep into your app’s performance metrics. From memory usage to CPU cycles, Android Studio’s profilers provide insights to optimize and enhance app responsiveness. Code completion and powerful debugging: Coding in Flutter becomes a breeze thanks to intelligent code suggestions and a robust debugger that quickly pinpoints and rectifies issues. Flutter-specific widget inspector: Understand and modify your Flutter widgets effortlessly. This specialized inspector visualizes and debugs the widget tree, simplifying UI adjustments. Fast build and deploy processes: Time is of the essence. Android Studio accelerates the build and deployment phases, ensuring swift transitions from coding to testing. DartPad Floating in the digital ether is DartPad, a minimalist yet potent online IDE tailored for the Flutter and Dart communities. It breaks down barriers by being accessible directly via a browser, making it an invaluable tool for quick coding experiments or when on the go. For those seeking a no-fuss, immediate Flutter coding environment, DartPad emerges as an impeccable choice.
Features Web-based with no installation required: Website accessibility is its middle name. DartPad requires no downloads or setups, offering a hassle-free, instant coding platform anytime, anywhere. Live preview feature: Witness your Flutter magic in real time. As you code, DartPad dynamically displays the results, aiding in immediate feedback and iterations. Supports Dart and Flutter libraries: Despite its lightweight nature, DartPad doesn’t skimp on essentials. It offers comprehensive support for Dart and Flutter libraries, ensuring a rich coding experience. Shareable code snippets: Collaboration is critical. Whether you want to share a piece of brilliance or seek feedback, DartPad’s shareable snippets make it effortless. Simple and intuitive interface: DartPad prides itself on its clean design. With an uncluttered interface, developers can focus purely on coding, free from distractions. IntelliJ IDEA In the grand tapestry of development environments, IntelliJ IDEA by JetBrains stands out as a multifaceted gem. Its prowess extends seamlessly to Flutter development, offering intuitive features and advanced capabilities. For those who prioritize depth in their coding assistance without compromising on efficiency, IntelliJ IDEA proves to be an indispensable ally in the Flutter domain.
Features Deep code understanding: Venture beyond the surface. IntelliJ IDEA delves into the semantics of your code, offering insights and suggestions that align with best practices and design patterns. Smart code completion: Efficiency at your fingertips. As you type, the Intellij IDE proactively offers code suggestions, streamlining the coding process and minimizing potential errors. Powerful code refactoring tools: Embrace change without fear. With robust refactoring capabilities, adapting and enhancing your Flutter codebase becomes a structured and error-free process. Built-in tools for profiling: Gauge the pulse of your application. IntelliJ IDEA’s profiling tools shed light on performance metrics, enabling optimizations and fine-tuning. Version control integration: Manage your code evolution with grace. Integrated version control ensures smooth transitions between code versions, collaborative coding, and well-maintained coding history. Flutlab In the dynamic arena of online IDEs, Flutlab emerges as a beacon for cloud-based Flutter development. Harnessing the power and flexibility of cloud technology, it reshapes the conventional boundaries of coding, offering a streamlined and accessible platform. For a Flutter developer seeking a seamless Flutter IDE online without the constraints of hardware or location, Flutlab unfolds as an impressive choice.
Features Real-time collaboration: Teamwork made simple. Flutlab facilitates synchronized coding sessions, allowing multiple developers to collaborate on projects, ensuring seamless teamwork and immediate feedback. Cloud-based simulator: Say goodbye to hefty local emulators. Test Flutter web applications directly within the browser using Flutlab’s efficient cloud simulator, saving time and system resources. Integration with popular repositories: Seamlessly connect with platforms like GitHub or Bitbucket. This integration ensures fluid code pulls, pushes, and version management. Direct APK download: Transition from development to testing in a snap. With Flutlab, developers can directly download the APK, facilitating swift app testing and deployment. Code analysis and debugging: Navigate the maze of code with precision. Flutlab’s tools offer insightful code analysis and a potent debugger, ensuring your Flutter apps are robust and error-free. XCode Diving into Apple’s ecosystem, XCode stands tall as the definitive development environment for those keen on reaching the iOS audience through Flutter. Seamlessly merging the robustness of Apple’s software architecture with Flutter’s adaptability, it crafts an unparalleled development experience.
Features Advanced debugging and profiling tools: With XCode, troubleshooting is elevated to an art form. Its suite of tools provides deep insights, ensuring your Flutter apps run optimally on iOS devices. Interface Builder: Envision and create dynamic Flutter UI with ease. The XCode Interface Builder offers a visual canvas, making UI/UX design intuitive and efficient. On-device testing support: Witness your creations in their natural habitat. Test directly on iOS devices to ensure performance and responsiveness. Asset management: Organize and manage multimedia with finesse. XCode’s asset catalog aids in streamlined resource utilization. Swift and C integration: While Flutter reigns supreme, the XCode IDE allows seamless integration with Swift and C, broadening developmental horizons. FlutterFlow Making its mark in the Flutter landscape is FlutterFlow, a revolutionary visual development platform. Eliminating traditional barriers, it provides a canvas where even non-coders can bring Flutter applications to life.
Features Drag-and-drop UI builder: Designing made simple. Sculpt interfaces without diving into code, making development swift and accessible. Firebase integration: Connect with Firebase effortlessly, enhancing functionalities like authentication, databases, and more. Real-time previews: Iterate with confidence. See changes as you make them, ensuring design perfection. Robust component library: A treasure trove of widgets and elements catering to diverse design needs. Collaboration and versioning features: Team up and maintain code history with precision, streamlining project management. Emacs Dart Mode For purists who find solace in Emacs, the Dart Mode extension brings Flutter to their fingertips. Merging the efficiency of Emacs with Flutter’s dynamism it offers a refined coding experience.
Features Syntax highlighting: Navigate code effortlessly with distinct color codes for better readability. Code formatting: Maintain a pristine codebase with automatic formatting, ensuring consistency. Integration with Dart SDK: Access Dart’s full potential seamlessly within the Emacs environment. Quick documentation access: Answers are just a keystroke away. Dive into Dart and Flutter documentation on the fly. Keyboard-centric commands: Embrace the power of keyboard shortcuts, enhancing coding speed and efficiency. RevenueCat While not a conventional IDE, RevenueCat is a vital tool for developers integrating in-app purchases and subscriptions in their Flutter apps. Simplifying the maze of monetization, it’s a catalyst for revenue generation.
Features Simplifies in-app billing: Navigate the intricacies of billing with ease, enhancing user experience and purchase success rates. Tracks revenue and metrics: Gauge your success. Monitor key metrics to strategize and optimize monetization. Supports multiple platforms: Not just limited to Flutter, RevenueCat’s broad platform support ensures consistent monetization strategies. Robust API: It offers ease and flexibility thanks to its robust API integration. Integrate with comfort and flexibility, leveraging RevenueCat’s powerful API. Atom Atom, an avant-garde text editor birthed by GitHub, extends its arms to Flutter developers through community-driven extensions. Marrying simplicity with adaptability, it emerges as a formidable environment for Flutter projects.
Features Git integration: With its roots in GitHub, Atom offers seamless Git operations, streamlining code management. Autocompletion for Flutter: Speed up your coding. Atom suggests code snippets, enhancing your Flutter coding rhythm. Embedded terminal: Access the terminal within the editor, streamlining tasks without switching windows. Smooth UI with themes: Personalize your workspace. With a vast array of themes, craft an environment that resonates with your aesthetic. The Main Benefits of IDEs & Text Editors for App Development Streamlined development cycle. Comprehensive code management. Integrated testing and debugging. Enhancing collaboration and productivity. Customization and extension support. Conclusion Choosing the best IDE for Flutter is pivotal, acting as the linchpin between ideas and execution. A Flutter IDE directly influences productivity, ensuring app development is both efficient and yields superior quality outcomes. Want to learn about how Pieces built their app? Read Pieces’ Flutter case study.