ratings_test.txt: 50K reviews held out for testing
ratings_train.txt: 150K reviews for training
각 파일에 있는 Column 은 <영화 아이디, 영화 평, 영화 평점> 입니다.
위의 세개의 파일을 raw형태로 다운로드 합니다.
Onebook 가상환경 하단에 NLP라는 폴더를 만들고 다운받은 파일을 이동합니다. "NaverMovieWord2Vec.py" 파이썬 파일을 새로 만들고 프로그래밍을 시작하겠습니다.
일단 저장된 파일을 csv를 사용해서 읽겠습니다. CSV란 Comma-separated values의 약자로서 CSV 파일은 각 라인의 컬럼들이 콤마로 분리된 텍스트 파일 포맷입니다. CSV 파일을 읽기 위해서는 먼저 파이썬에 기본 내장된 csv 모듈을 import 합니다. 다음 .csv 파일을 오픈하고 파일객체를 csv.reader(파일객체) 에 넣으면 됩니다. csv.reader() 함수는 Iterator 타입인 reader 객체를 리턴하므로 for 루프를 돌며 한 라인씩 가져올 수 있습니다. CSV 파일과 비슷하지만, 콤마 대신 Tab으로 컬럼을 분리하는 파일포맷을 TSV 파일이라 합니다. TSV 파일은 컬럼 delimiter만 차이가 나므로, csv 모듈의 reader() 혹은 writer() 함수에서 delimiter='\t' 옵션만 지정해 주면 나머지는 CSV와 동일합니다. Naver sentiment movie corpus는 탭으로 구분되어 있으므로 TSV를 읽는 방식으로 읽습니다.
여기에서 “Josa”, “Eomi”, “'Punctuation”는 제외하고 처리해야 합니다. 전체 소스는 다음과 같습니다.
 import csv
 from konlpy.tag import Okt
 from gensim.models import word2vec

 #네이버 영화 코퍼스를 읽는다.
 f = open('ratings_train.txt', 'r', encoding='utf-8')
 rdr = csv.reader(f, delimiter='\t')
 rdw = list(rdr)
 f.close()

 #트위터 형태소 분석기를 로드한다. Twiter가 KoNLPy v0.4.5 부터 Okt로 변경 되었다.
 twitter = Okt()

 #텍스트를 한줄씩 처리합니다.
 result = []
 for line in rdw:
     #형태소 분석하기, 단어 기본형 사용
     malist = twitter.pos( line[1], norm=True, stem=True)
     r = []
     for word in malist:
         #Josa”, “Eomi”, “'Punctuation” 는 제외하고 처리
         if not word[1] in ["Josa","Eomi","Punctuation"]:
             r.append(word[0])
     #형태소 사이에 공백 " "  을 넣습니다. 그리고 양쪽 공백을 지웁니다.
     rl = (" ".join(r)).strip()
     result.append(rl)
     #print(rl)

 #형태소들을 별도의 파일로 저장 합니다.
 with open("NaverMovie.nlp",'w', encoding='utf-8') as fp:
     fp.write("\n".join(result))

 #Word2Vec 모델 만들기
 wData = word2vec.LineSentence("NaverMovie.nlp")
 wModel =word2vec.Word2Vec(wData, size=200, window=10, hs=1, min_count=2, sg=1)
 wModel.save("NaverMovie.model")
 print("Word2Vec Modeling finished")
위의 코드를 실행하면 종료 할 때까지 많은 시간이 걸립니다. 결과는 NaverMovie.model 파일입니다. 어미, 조사, 구두점을 제외하고 동사와 형용사는 기본형으로 학습하도록 입력 텍스트를 만들었습니다. 공백으로 구분된 텍스트 파일을 Word2Vec에 전달하고 생성된 모델을 save()로 저장했습니다.
이제 위에서 생성한 모델을 사용하여 단어 유사도를 확인해 보겠습니다.
다시 NaverMovieModelTest.py 라는 파일을 만들어 다음의 코드를 입력 해 봅니다.
from gensim.models import word2vec

model = word2vec.Word2Vec.load("NaverMovie.model")

print(model.most_similar(positive=["재미"]))

print(model.most_similar(positive=["최고"]))
NLTK와 같은 부엌 싱크대 NLP 연구 라이브러리를 포함한 모든 것이 아닙니다.대신 Gensim은 주제 모델링을위한 성숙하고 집중적이며 효율적인 NLP 도구 모음입니다.특히이 튜토리얼에서는 텍스트에서 새로운 단어 벡터를 학습하기위한 Word2Vec 단어 임베딩 구현을 지원합니다.
또한 사전 학습 된 단어 임베딩을 몇 가지 형식으로로드하고로드 된 임베딩을 사용하고 쿼리하기위한 도구를 제공합니다.
그런 다음Word2Vec.load ()함수를호출하여 저장된 모델을 다시로드 할 수 있습니다.예를 들면 :
model = Word2Vec.load('model.bin')
이 모든 것을 실제 예제와 함께 묶을 수 있습니다.
파일에서 큰 텍스트 문서 나 말뭉치를로드하는 대신 미리 토큰 화 된 문장의 작은 메모리 내 목록을 사용하여 작업합니다.모델이 학습되고 단어의 최소 개수가 1로 설정되어 단어가 무시되지 않습니다.
모델을 학습 한 후 요약하고 어휘를 인쇄 한 다음 '문장'이라는 단어에 대한 단일 벡터를 인쇄합니다.
마지막으로 모델은 바이너리 형식의 파일에 저장되고로드 된 다음 요약됩니다.
from gensim.models import Word2Vec
# define training data
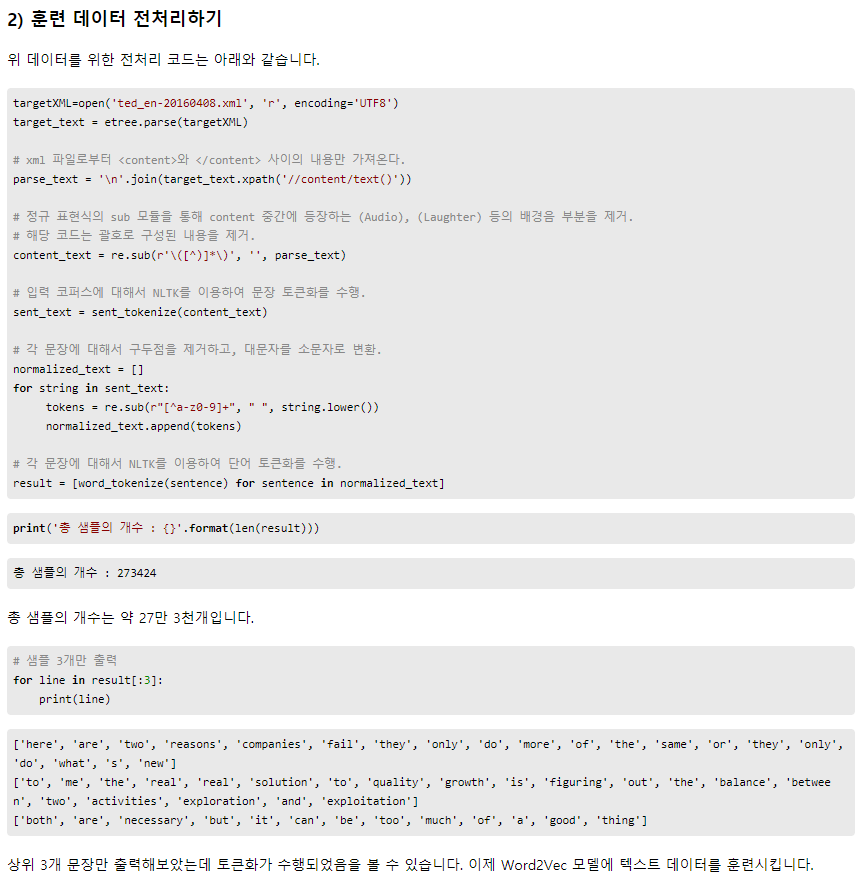
sentences = [['this', 'is', 'the', 'first', 'sentence', 'for', 'word2vec'],
['this', 'is', 'the', 'second', 'sentence'],
['yet', 'another', 'sentence'],
['one', 'more', 'sentence'],
['and', 'the', 'final', 'sentence']]
# train model
model = Word2Vec(sentences, min_count=1)
# summarize the loaded model
print(model)
# summarize vocabulary
words = list(model.wv.vocab)
print(words)
# access vector for one word
print(model['sentence'])
# save model
model.save('model.bin')
# load model
new_model = Word2Vec.load('model.bin')
print(new_model)
참고:알고리즘 또는 평가 절차의 확률 적 특성 또는 수치 정밀도의 차이에따라 결과가 달라질 수 있습니다.예제를 몇 번 실행하고 평균 결과를 비교해보십시오.
다음과 같이scikit-learnPCA 클래스를사용하여 단어 벡터의 2 차원 PCA 모델을 만들 수 있습니다.
pca = PCA(n_components=2)
result = pca.fit_transform(X)
결과 투영은 다음과 같이 matplotlib를 사용하여 플로팅 할 수 있으며 두 차원을 x 및 y 좌표로 끌어낼 수 있습니다.
pyplot.scatter(result[:, 0], result[:, 1])
한 단계 더 나아가 그래프의 포인트에 단어 자체로 주석을 달 수 있습니다.좋은 오프셋이없는 조잡한 버전은 다음과 같습니다.
words = list(model.wv.vocab)
for i, word in enumerate(words):
	pyplot.annotate(word, xy=(result[i, 0], result[i, 1]))
이 모든 것을 이전 섹션의 모델과 함께 종합하면 전체 예제가 아래에 나열됩니다.
from gensim.models import Word2Vec
from sklearn.decomposition import PCA
from matplotlib import pyplot
# define training data
sentences = [['this', 'is', 'the', 'first', 'sentence', 'for', 'word2vec'],
			['this', 'is', 'the', 'second', 'sentence'],
			['yet', 'another', 'sentence'],
			['one', 'more', 'sentence'],
			['and', 'the', 'final', 'sentence']]
# train model
model = Word2Vec(sentences, min_count=1)
# fit a 2d PCA model to the vectors
X = model[model.wv.vocab]
pca = PCA(n_components=2)
result = pca.fit_transform(X)
# create a scatter plot of the projection
pyplot.scatter(result[:, 0], result[:, 1])
words = list(model.wv.vocab)
for i, word in enumerate(words):
	pyplot.annotate(word, xy=(result[i, 0], result[i, 1]))
pyplot.show()
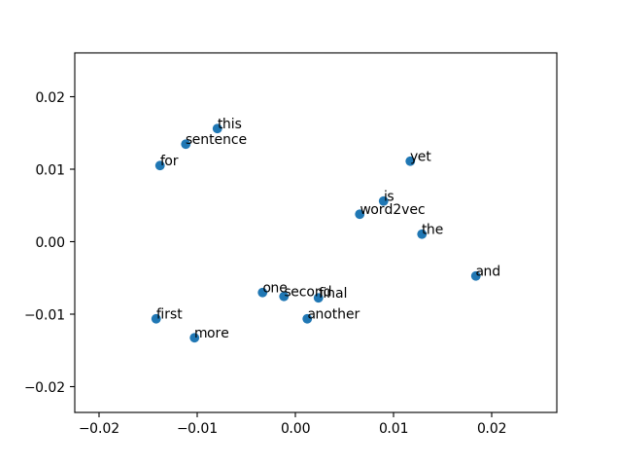
예제를 실행하면 단어로 주석이 추가 된 점이있는 산점도가 생성됩니다.
참고:알고리즘 또는 평가 절차의 확률 적 특성 또는 수치 정밀도의 차이에따라 결과가 달라질 수 있습니다.예제를 몇 번 실행하고 평균 결과를 비교해보십시오.
이러한 작은 말뭉치가 모델에 적합하게 사용 되었기 때문에 그래프에서 많은 의미를 끌어 내기는 어렵습니다.
Word2Vec 모델의 PCA 투영 산점도
Google의 Word2Vec 임베딩로드
자신의 단어 벡터를 훈련하는 것이 주어진 NLP 문제에 대한 최선의 접근 방식 일 수 있습니다.
그러나 시간이 오래 걸리고 RAM과 디스크 공간이 많은 빠른 컴퓨터, 입력 데이터 및 학습 알고리즘을 미세 조정하는 데 일부 전문 지식이 필요할 수 있습니다.
사전 훈련 된 모델은 토큰 및 관련 단어 벡터를 포함하는 파일에 지나지 않습니다.사전 학습 된 Google word2vec 모델은 Google 뉴스 데이터 (약 1,000 억 단어)에서 학습되었습니다.300 만 개의 단어와 구가 포함되어 있으며 300 차원 단어 벡터를 사용하여 적합했습니다.
GloVe 웹 사이트에서 가장 작은 GloVe 사전 훈련 된 모델을 다운로드 할 수 있습니다.60 억 개의 토큰과 400,000 개의 단어 어휘로 Wikipedia 데이터에 대해 학습 된 4 가지 모델 (50, 100, 200 및 300 차원 벡터)이 포함 된 822MB zip 파일입니다.
단어 임베딩(Word Embedding)이란 텍스트를 구성하는 하나의 단어를 수치화하는 방법의 일종이다.
텍스트 분석에서 흔히 사용하는 방식은 단어 하나에 인덱스 정수를 할당하는 Bag of Words 방법이다. 이 방법을 사용하면 문서는 단어장에 있는 단어의 갯수와 같은 크기의 벡터가 되고 단어장의 각 단어가 그 문서에 나온 횟수만큼 벡터의 인덱스 위치의 숫자를 증가시킨다.
즉 단어장이 "I", "am", "a", "boy", "girl" 다섯개의 단어로 이루어진 경우 각 단어에 다음과 같이 숫자를 할당한다.
"I": 0
"am": 1
"a": 2
"boy": 3
"girl": 4
이 때 "I am a girl" 이라는 문서는 다음과 같이 벡터로 만들 수 있다.
[11101]
단어 임베딩은 하나의 단어를 하나의 인덱스 정수가 아니라 실수 벡터로 나타낸다. 예를 들어 2차원 임베딩을 하는 경우 다음과 같은 숫자 벡터가 될 수 있다.
V개의 단어를 가지는 단어장이 있을 때, 단어를 BOW 방식으로 크기 V인 벡터로 만든 다음 다음 그림과 같이 하나의 은닉층(Hidden Layer)을 가지는 신경망을 사용하여 특정 단어 열(word sequence)이 주어졌을 때 다음에 나올 단어를 예측하는 문제를 생각해 보자. 입력과 출력은 모두 BOW 방식으로 인코딩되어 있다.
이미지 출처: "word2vec Parameter Learning Explained", Xin Rong
입력 x가 들어가면 입력 가중치 행렬 WT이 곱해져서 은닉층 벡터 h가 되는데 x가 one-hot-encoding 된 값이므로 h 벡터는 입력 가중치 행렬 W의 행 하나가 된다.
h=WTx=vTi
여기에서 i는 입력 벡터 x 의 값이 1인 원소의 인덱스이다. 즉, BOW 단어장에서 i번째 단어를 뜻한다.
벡터 h는 다시 출력 가중치 행렬 W′T와 곱해져서 출력 벡터 y가 된다.
y=W′Th
출력 가중치 행렬 W′의 j번째 열을 vj라고 하면 출력 벡터 y의 j번째 원소의 값은 다음과 같다.
yj=v′Tjh
가중치 행렬을 갱신하는 최적화 공식을 살펴본다. 자세한 유도과정은 논문을 참조한다.
우선 출력 가중치 행렬의 갱신 공식은 다음과 같다.
v′(new)j=v′(old)j−η⋅ej⋅h=v′(old)j−η⋅ej⋅vTi
이 식에서 η는 최적화 스텝 사이즈, ej는 출력 오차가 된다. 이 공식에 따르면 벡터 v′j는 vj 방향으로 수렴해 간다. 즉, i번째 단어와 j번째 단어가 연속하는 관계라면 v′j가 vi와 유사한 위치로 수렴한다는 뜻이다.
다음으로 입력 가중치 행렬의 갱신 공식은 다음과 같다.
v(new)i=v(old)i−η∑kej⋅w′ik
이 공식에 따르면 벡터 vi는 여러 v′k 벡터의 가중합으로 수렴해 간다. 이렇게 단어간의 관계에 의해 i번째 단어를 뜻하는 vi의 값들이 연관성을 가지게 되는데 이 vi 벡터 값을 해당 단어에 대한 분산 표현 (distributed representation) , 벡터 표현 (vector representation) 또는 단어 임베딩 (word embedding)이라고 한다.
이미지 출처: https://www.tensorflow.org/versions/master/tutorials/word2vec/index.html
위의 방식은 하나의 단어로부터 다음에 오는 단어를 예측하는 문제였다. 이러한 문제를 단어 하나짜리 문맥(single-word context)를 가진다고 한다.
CBOW (Continuous Bag of Words) 방식은 복수 단어 문맥(multi-word context)에 대한 문제 즉, 여러개의 단어를 나열한 뒤 이와 관련된 단어를 추정하는 문제이다. 즉, 문자에서 나오는 n개의 단어 열로부터 다음 단어를 예측하는 문제가 된다. 예를 들어
the quick brown fox jumped over the lazy dog
라는 문장에서 (the, quick, brown) 이라는 문맥이 주어지면 fox라는 단어를 예측해야 한다.
CBOW는 다음과 같은 신경망 구조를 가진다. 여기에서 각 문맥 단어를 은닉층으로 투사하는 가중치 행렬은 모든 단어에 대해 공통으로 사용한다.
이미지 출처: "word2vec Parameter Learning Explained", Xin Rong
Update the model’s neural weights from a sequence of sentences (can be a once-only generator stream). For Word2Vec, each sentence must be a list of unicode strings. (Subclasses may accept other examples.)
문장의 시퀀스에서 모델의 신경 가중치를 업데이트하십시오 (한 번만 생성기 스트림 일 수 있음). Word2Vec의 경우 각 문장은 유니 코드 문자열 목록이어야합니다. 서브 클래스는 다른 예를 받아들이는 일이 있습니다.
To support linear learning-rate decay from (initial) alpha to min_alpha, either total_examples (count of sentences) or total_words (count of raw words in sentences) should be provided, unless the sentences are the same as those that were used to initially build the vocabulary.
(초기) alpha에서 min_alpha까지의 선형 학습 률 감소를 지원하려면, 문장이 처음 빌드에 사용 된 것과 같지 않으면 total_examples (문장의 수) 또는 total_words (문장의 원시 단어의 수)가 제공되어야합니다 어휘.
>>> model.save(fname)>>> model=Word2Vec.load(fname)# you can continue training with the loaded model!
The word vectors are stored in a KeyedVectors instance in model.wv. This separates the read-only word vector lookup operations in KeyedVectors from the training code in Word2Vec.
>>> model.wv['computer']# numpy vector of a wordarray([-0.00449447, -0.00310097, 0.02421786, ...], dtype=float32)
model 이 잘 불러와졌는지 확인하려면 model의 내용을 보자.
model.vocab 하며 내용을 볼 수 있다.
most_similar 에서 vocaburary에 단어가 없다고 에러나오면 내용을 확인 후 다시 검색해보면 된다.